Open Parcel, Orbit, Quarry, or Lumen from Applications. Each app can be used on its own.
Set up mail in Parcel, calendars in Orbit, and a notes folder in Quarry. Set up an AI endpoint in Lumen only when you want generated answers or drafts.
The package is signed and notarized. This guide covers Parcel 0.1.0 build 3, Orbit 1.1.0 build 20, Lumen 0.3.0 build 6, and the Quarry 0.1.0 bundle included in Canopy 0.1.5. Install all four apps to use the latest builds across the suite. Each app opens independently; a handoff opens only its selected destination.
Canopy shares selected context through approved local app connections.
Open the apps you want to connect. Use the suite setup offer if it appears, or the app’s Canopy connections controls. In Lumen, open Preferences → Connect to apps; Orbit also offers Canopy connections in the sidebar.
Review the recognized app and the accounts, calendars, or notes folders being offered. Approve only the displayed capabilities you want.
Choose display/search and AI-use permissions separately. Check the connection status before searching or preparing a handoff.
Return to Connections to disconnect or revoke access. If an app was rebuilt or its identity changed, inspect it again before reconnecting.
The owning app normally needs to be running for Canopy queries. Parcel’s and Orbit’s optional background helpers serve their own mail/reminder duties; they do not make every Canopy source available when its app is closed.
A missing or revoked owner does not silently switch to direct-file access. Earlier notes and conversations you saved remain separate copies.
Lumen uses an Ollama-compatible endpoint for generation.
Start your chosen Ollama-compatible server and make a model available.
Open Lumen → Preferences with ⌘,. Check the server address and choose a model. The default address is http://localhost:11434.
Approve AI use for the particular source scopes you want. Display-only sources can appear in search but are excluded from model requests.
Ask a question and inspect the answer’s sources. Review any proposed note, mail draft, or event before saving or sending it.
A local server can serve cloud models. Choose a locally installed model if you want inference to stay on your Mac. An OpenAI-compatible /v1 endpoint is not implemented.
Parcel, Orbit, and Quarry do not require an AI model. Lumen’s source search and factual brief information can remain useful when generation is unavailable.
Images in this guide use fictional mail, demo calendars, synthetic personal records, or a sample notes vault.
Native fixture captures show actual app controls rendered with synthetic data. Quarry’s new captures show the current frontend in browser preview; local filesystem history and Git are installed-app features. Older captures may differ in accent color or small details.
Click a screenshot to enlarge it. The guide, images, and fonts are stored locally, so you can keep the whole folder and use it offline. Use Print guide to make a paper copy or a PDF through your browser.
Use local search first; fetch older matches when you need more history.
Open Settings → Accounts to add or review an account. Gmail uses Google sign-in; iCloud/IMAP uses its account connection settings.
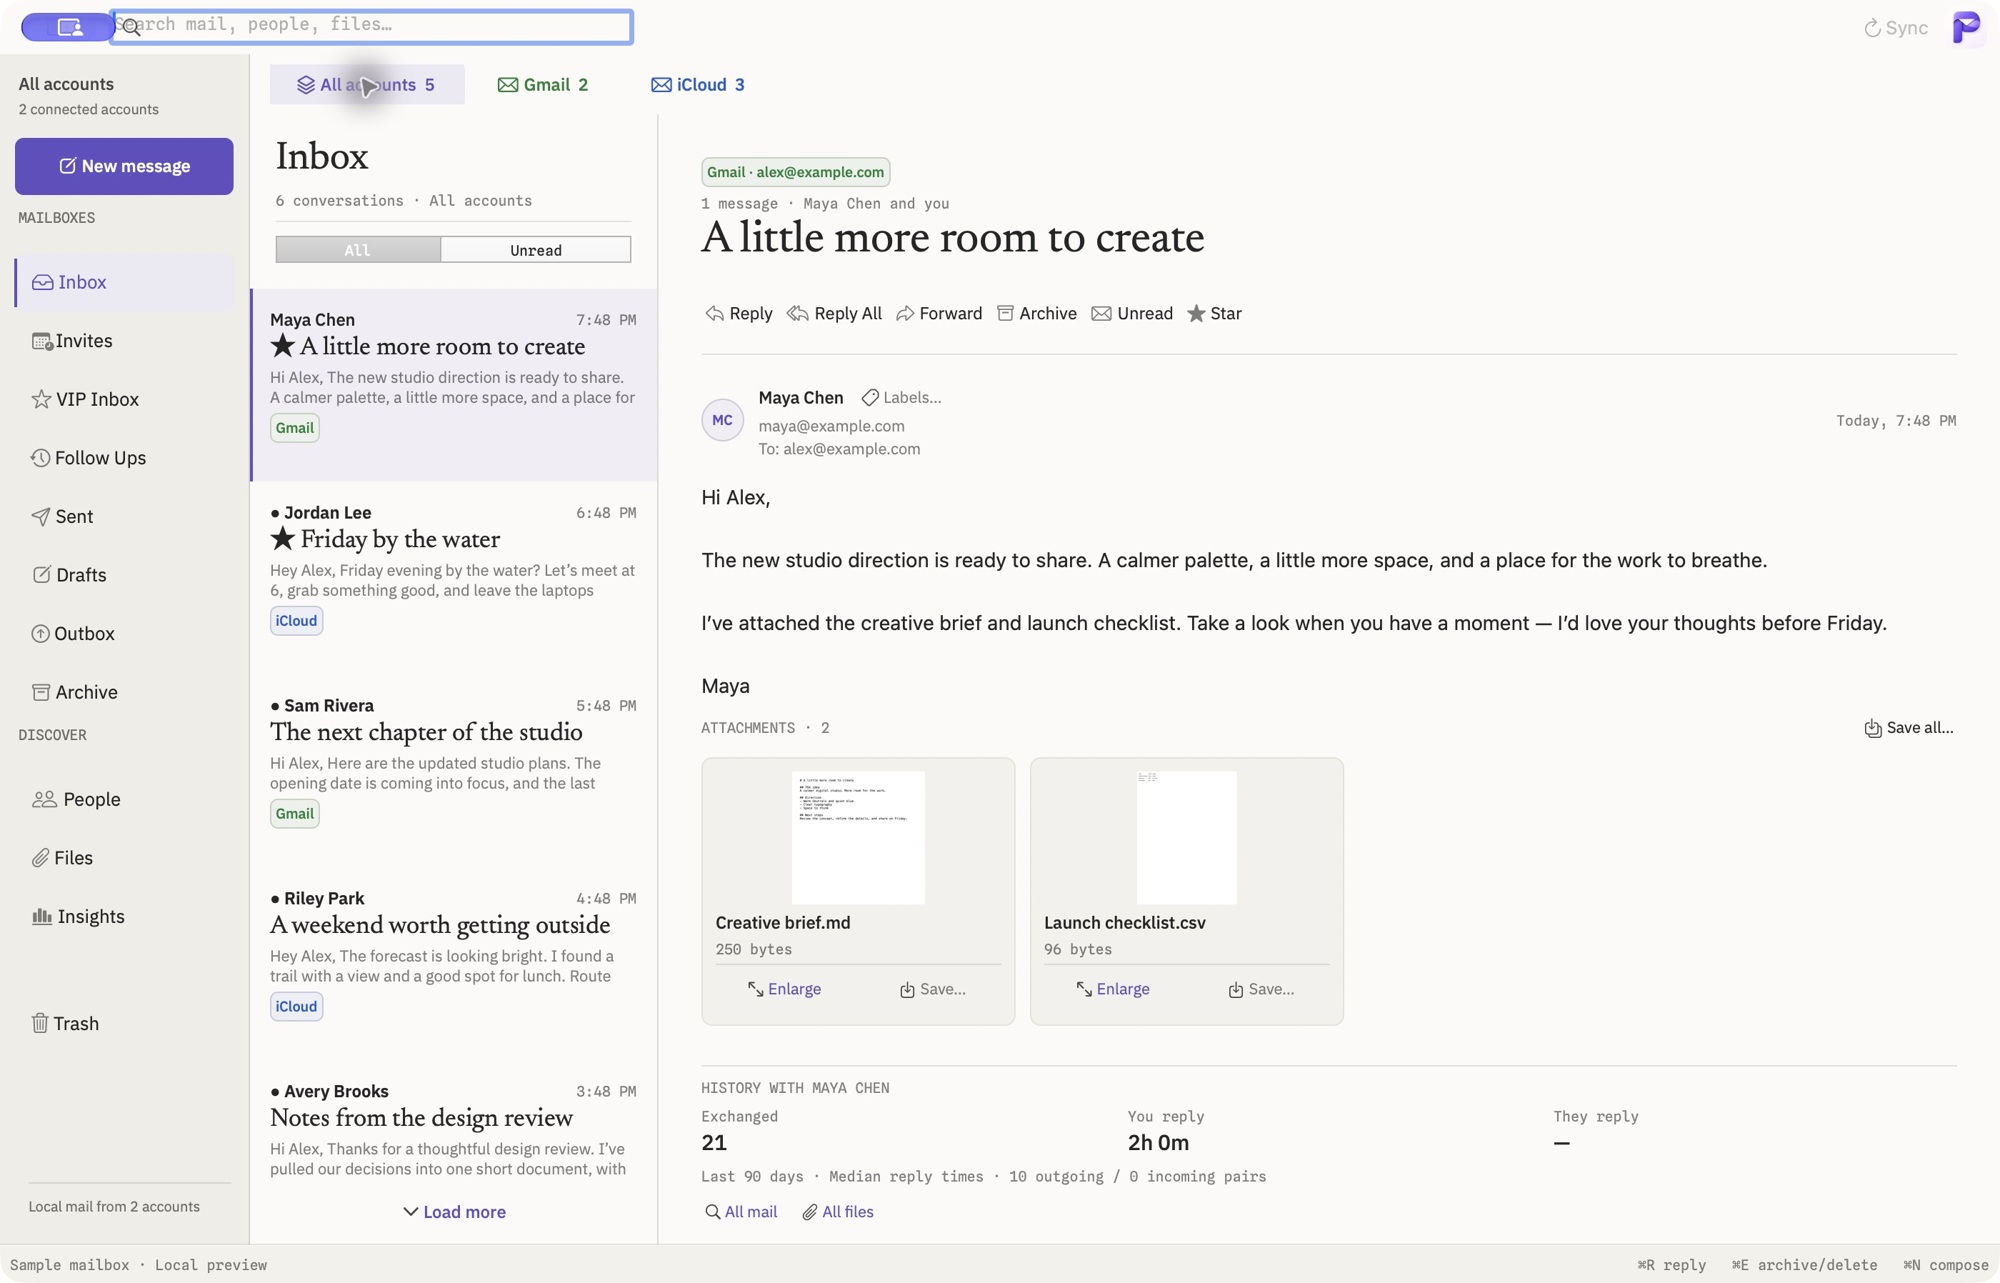
Choose All accounts or an account tab. Read the selected message’s account chip before replying or changing mail.
Search with words or filters such as from:maya has:attachment, subject:proposal, or after:2026-10-01. Local results search the cached index.
Choose Search older mail online for messages outside the cache. Request the next page if needed; downloaded matches join the same local results.
Gmail’s online search uses Gmail query syntax. IMAP supports a smaller set of words, sender/recipient/subject, read/star state, and date filters; unsupported filters are explained. Online search does not trigger arrival rules or new-mail alerts.
Parcel’s combined inbox with fictional local mail. Click to enlarge ↗Back to Parcel ↑
Save and sync drafts
Drafts save locally first, then sync through the owning account’s Drafts folder.
Write a message. When closing a nonempty composer, choose Save to keep the draft, Don’t Save to delete it, or Cancel to keep writing.
Open Drafts and check its status: Saved locally · sync pending, Synced across devices, or a sync error. Press Return in Preview Desk to resume editing.
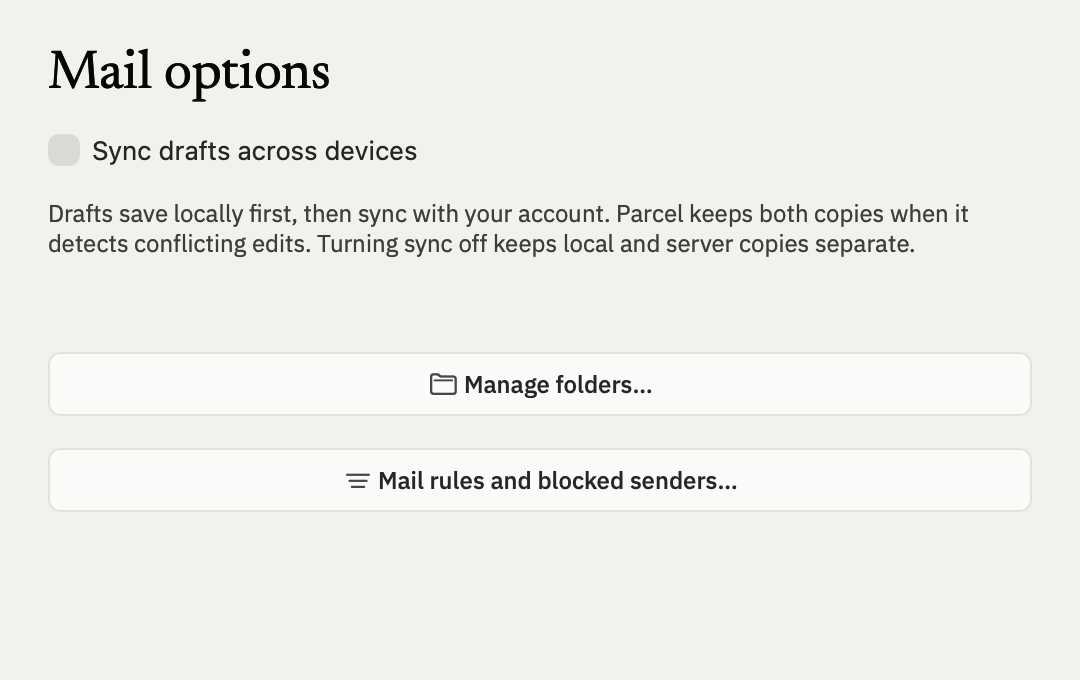
Use Settings → Accounts → Mail options → Sync drafts across devices to turn account draft sync on or off.
If a conflicting remote edit is detected, inspect the separate remote and Mac copies. Keep the wording you want before deleting a redundant copy.
Sync defaults on for Gmail and iCloud/IMAP. The screenshot shows an off checkbox in a synthetic test, rather than the normal default. Turning sync off keeps local and server drafts separate.
A newer remote version does not replace an open or locally changed draft. Offline edits retry during a later sync. Simultaneous remote edits during Gmail’s final update window cannot be fully prevented.
Deleting a draft can be undone with ⌘Z. Don’t Save also queues deletion of the synced version.
Native Mail options fixture: draft sync, folders, and mail rules. Click to enlarge ↗Back to Parcel ↑
Schedule a message with Send Later
Choose the delivery time now and review it in Scheduled.
Compose the message and check its sending account and recipients.
Open the composer’s more menu and choose Send Later…. Choose the date and time in the picker.
Open the Scheduled mailbox to see dated deliveries. Use Edit / Cancel scheduled send before delivery begins to return it to an editable draft.
Keep the Mac awake and online with Parcel running, or opt in to Background mail in Accounts settings. Complete any macOS Login Items & Extensions approval yourself.
Sleeping Macs catch up after wake; scheduling is not a promise of delivery while the Mac is asleep or offline. Queued messages survive restarts.
Undo Send applies before delivery starts and cannot recall delivered mail. A definite connection failure can retry; an uncertain outcome requires Check Sent before another send.
Keep the picture in the message and files in the attachment strip.
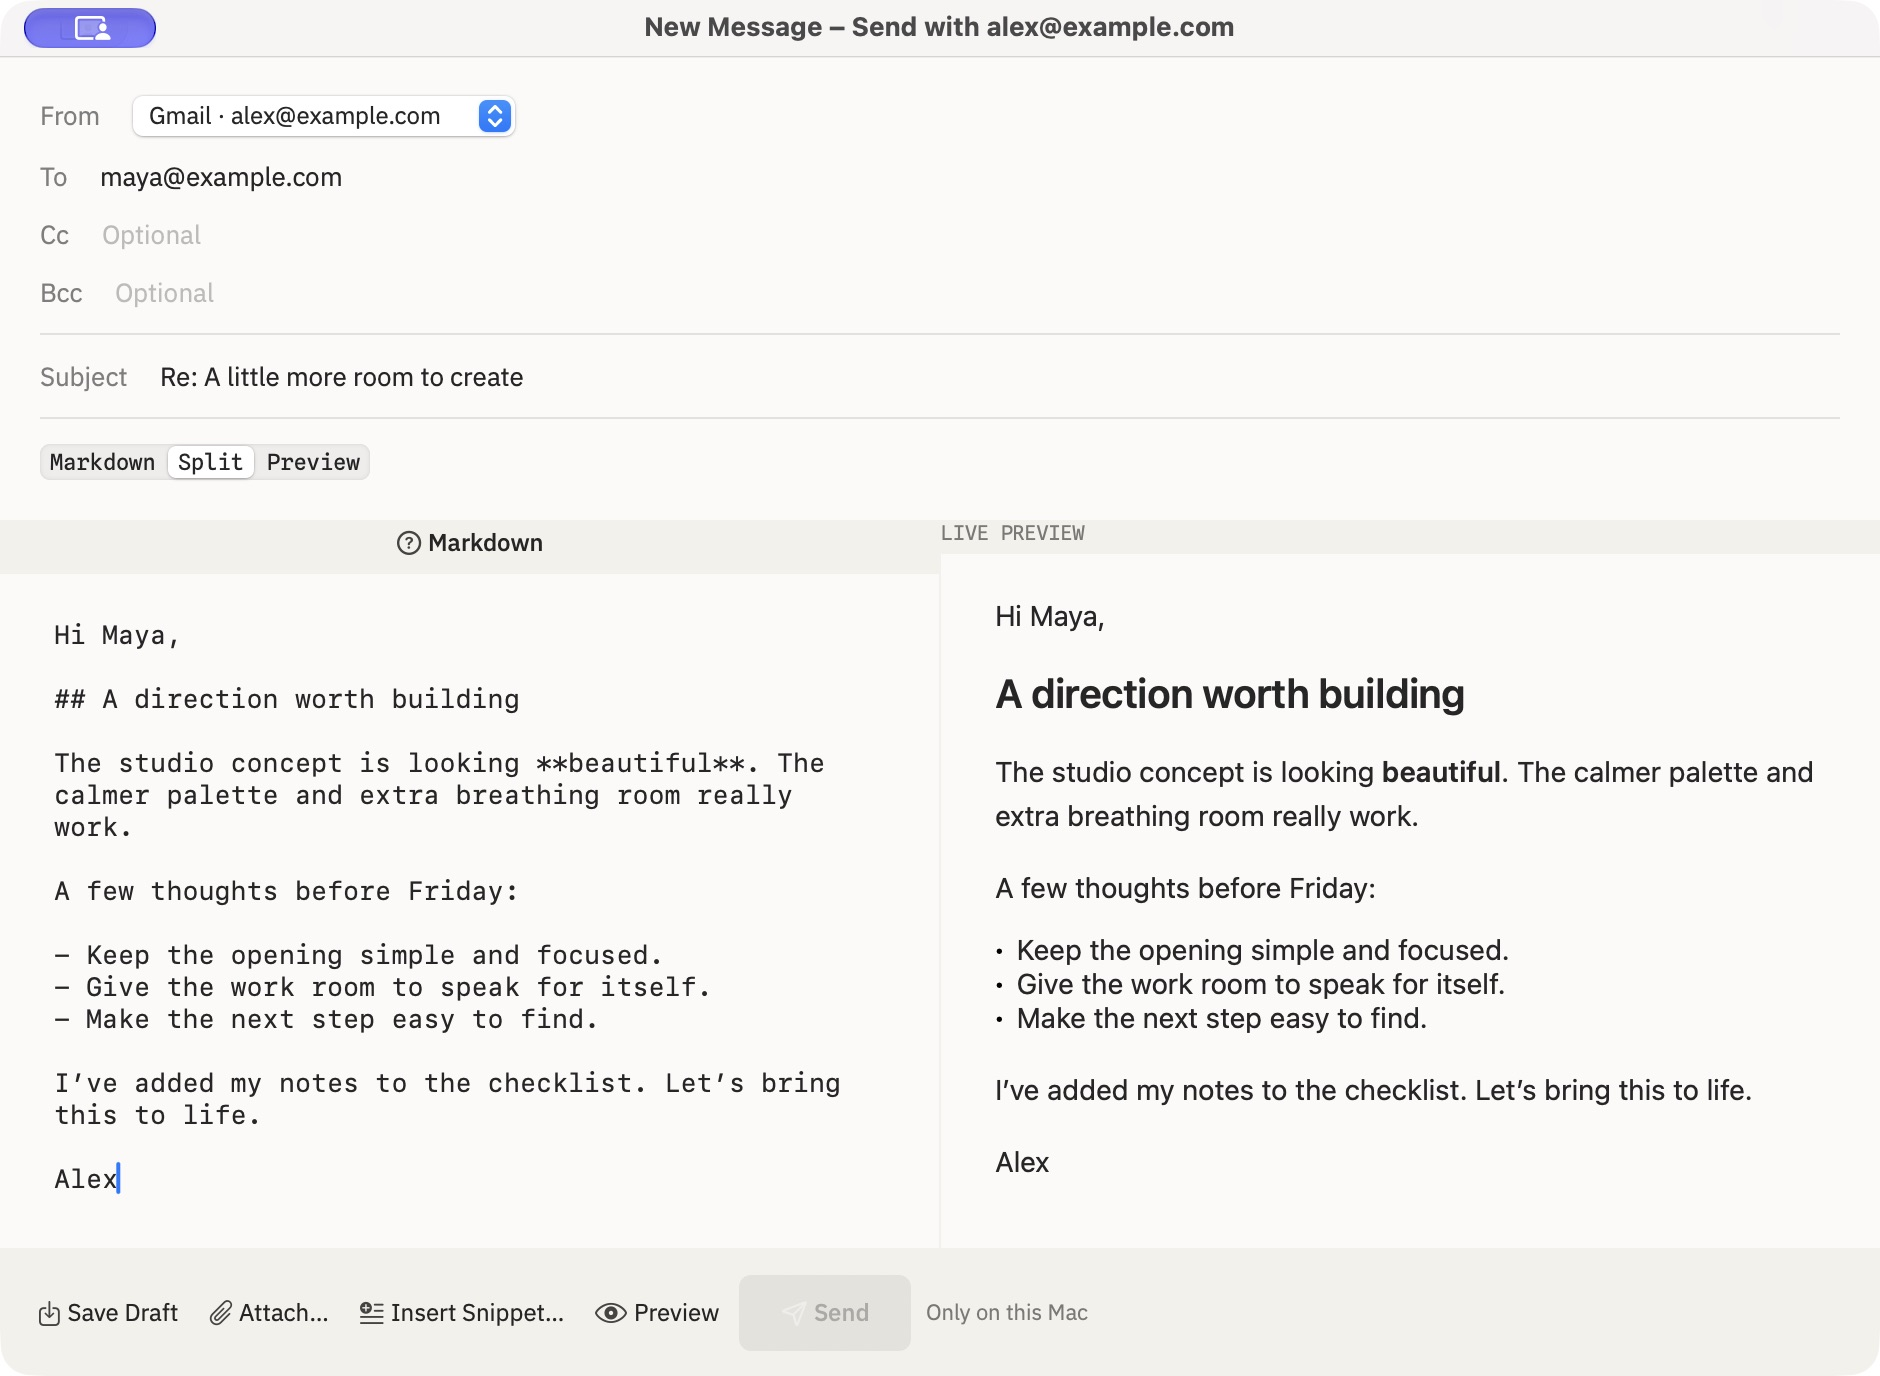
Paste or drop an image into the rich-text message body. Use Aa to choose an inline width of 240, 480, or 700 points.
Add ordinary file attachments to the filmstrip. Review the recipients, message, and attached files before sending.
If the newly written body mentions an attachment but none is attached, respond to Parcel’s reminder. Quoted history does not trigger it.
Reduce an oversized message if Parcel prevents it from entering the queue, or review the large-message warning for another IMAP account.
Drafts retain images and formatting. Sending embeds inline images using related MIME parts. Edits in another mail client may change the draft’s representation.
Parcel’s composer with fictional content; an earlier app capture. Click to enlarge ↗Back to Parcel ↑
Use rules and unblock a sender
Rules run locally on newly downloaded Inbox mail.
Open an account’s Mail options → Mail rules and blocked senders….
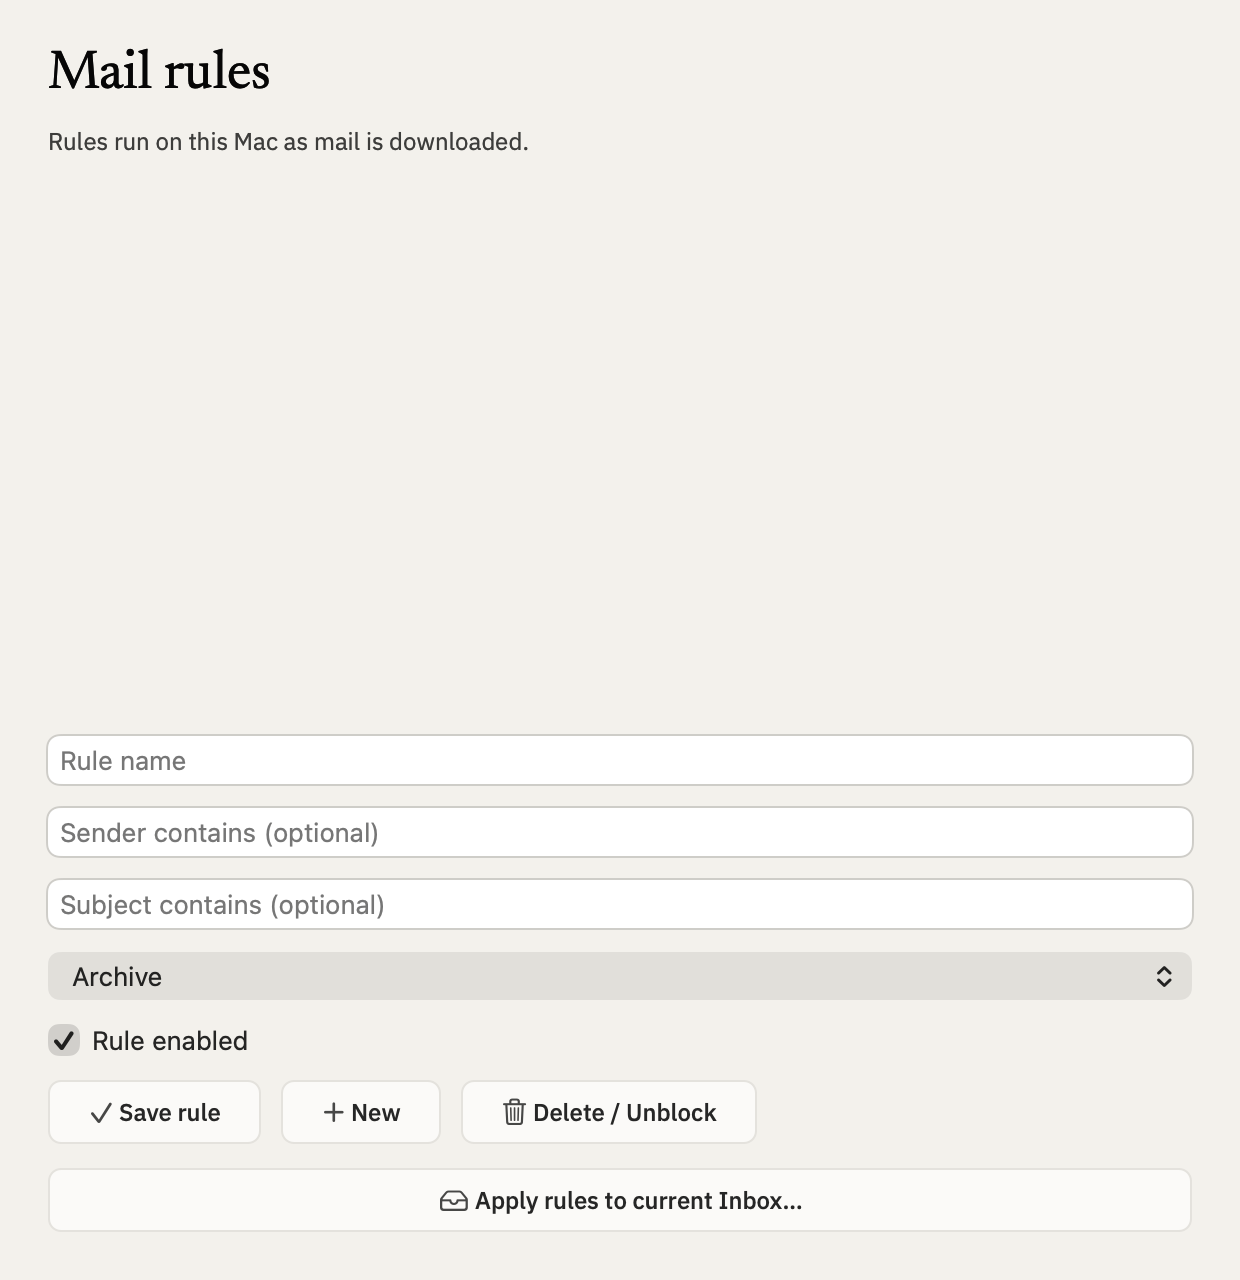
Name the rule. Set a sender or subject condition, choose an action, and save it with Rule enabled checked.
Choose actions such as archive, Junk, Trash, mark read, star, a Gmail label, or an IMAP folder as offered for the account.
Use Apply rules to current Inbox… only when you want to process existing Inbox mail. That batch supports one Undo step.
Select a blocked sender and use Delete / Unblock to remove the local block.
Rules and blocked senders are local to this Mac. Normal refreshes and online search results do not rerun arrival rules.
Native Mail rules fixture with synthetic sender conditions and actions. Click to enlarge ↗Back to Parcel ↑
Manage folders, labels, and junk
Use provider-appropriate organization from the message or account controls.
In Mail options, choose Manage labels… for Gmail or Manage folders… for IMAP. Create or rename a destination.
Use the message’s more actions to apply a Gmail label or move an IMAP message. Use ⌘Z to undo a supported move.
Choose Report junk or Not junk from a message menu. More actions can block the sender; future matching Inbox mail moves quietly to Junk.
Remove labels or folders only through the management controls. System folders are protected, and an IMAP folder must be empty before deletion.
People and attachments retain the account and conversation they came from.
Open Writing settings to enable macOS Contacts suggestions if desired. After granting permission, select a contact or group in a recipient field; a group inserts individual recipient pills.
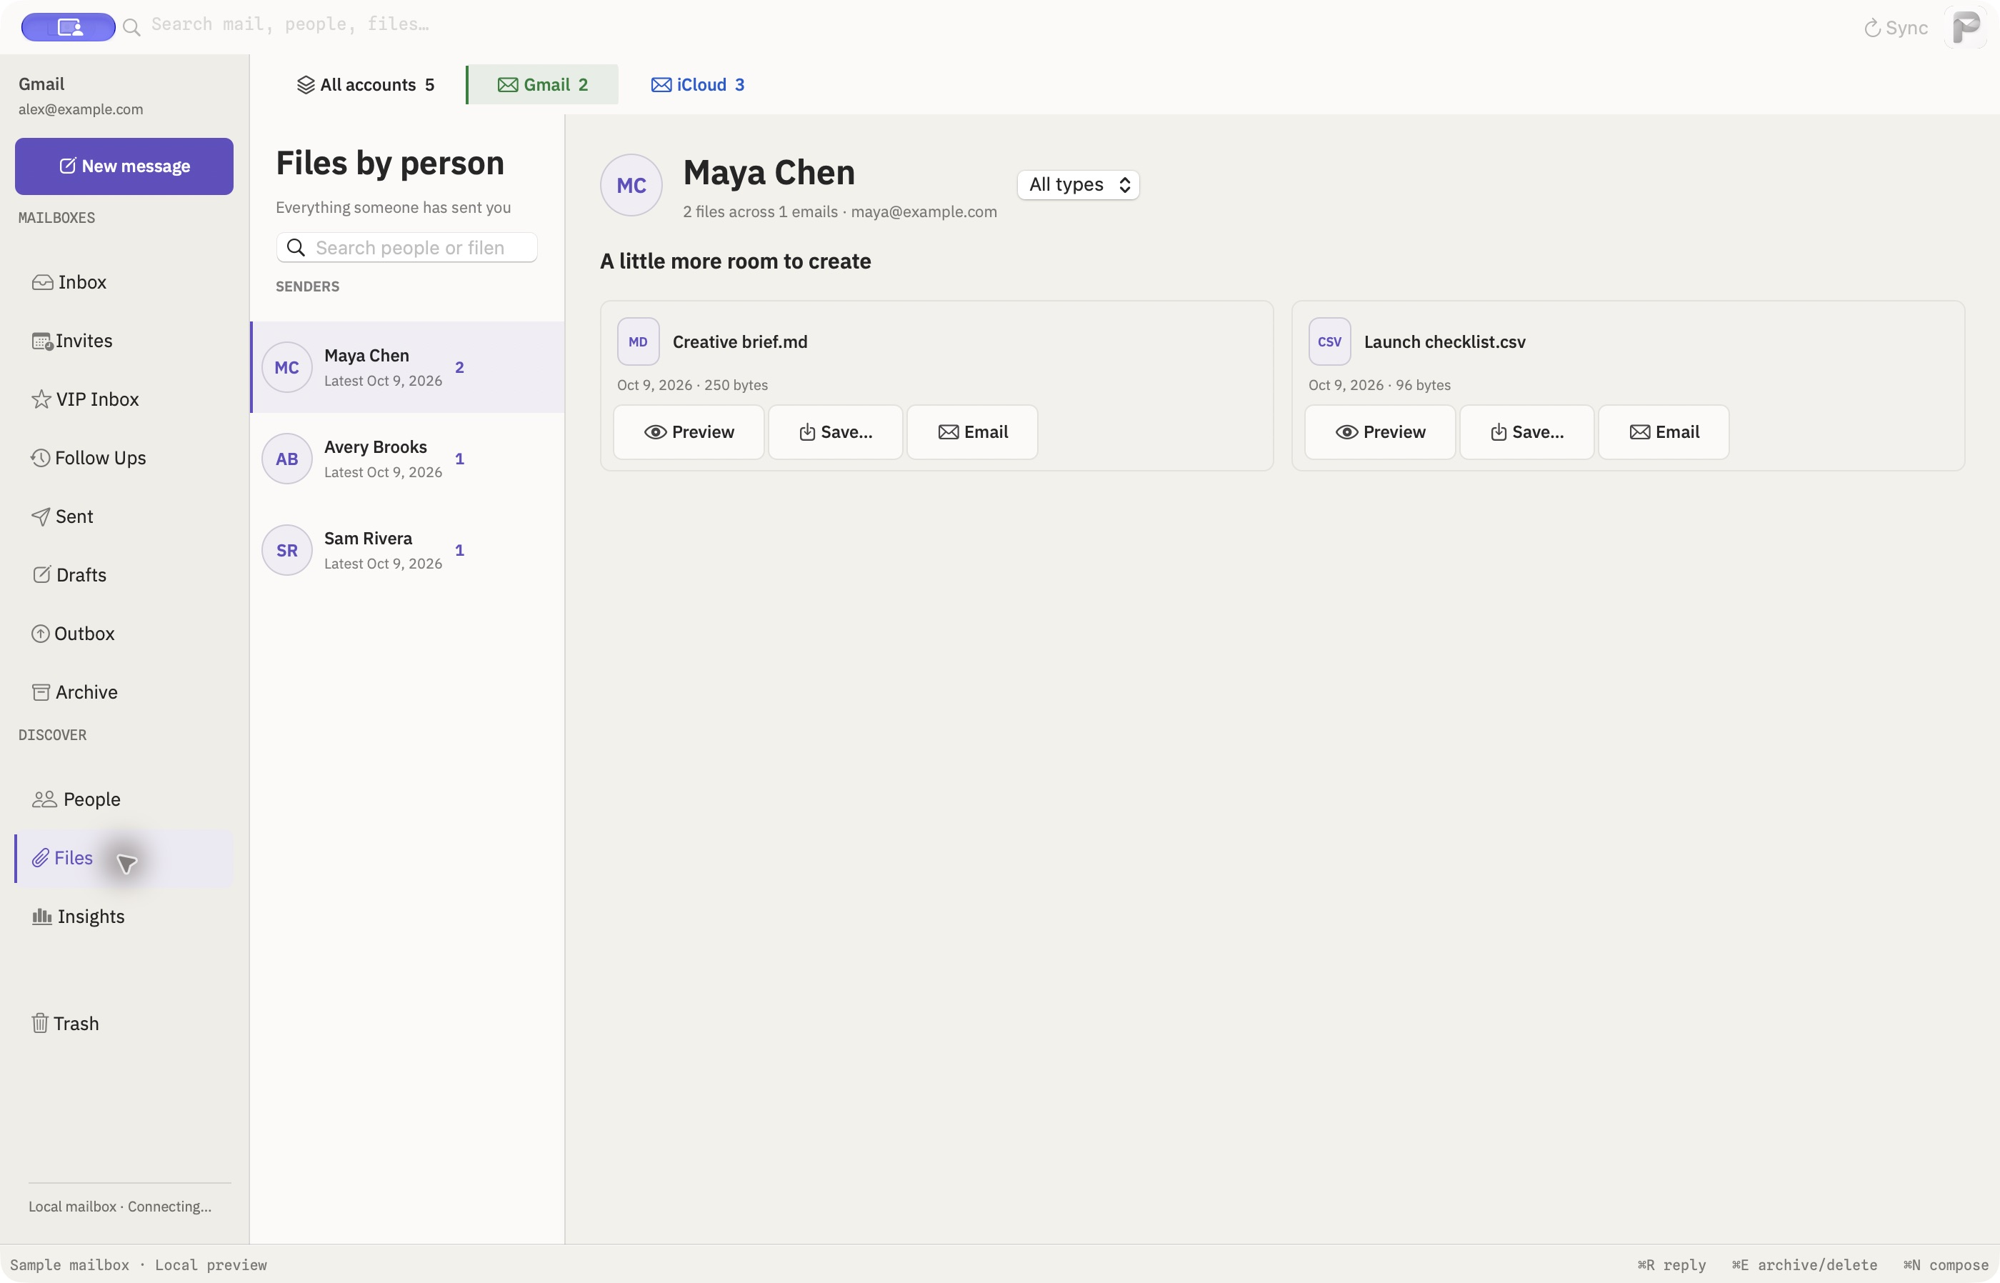
Open People to inspect correspondence or received files. Open Files for the attachment list and preview; Return opens its source email.
Use message more actions → Print / Save PDF… for a light, paginated document.
Choose Export Original Message… to save the original .eml bytes. After its first export is cached, the original remains exportable offline.
You can disable Contacts access. Existing correspondence ranking remains first.
Attachment Desk with fictional files and owning-message context. Click to enlarge ↗Back to Parcel ↑
Orbit
A calendar for your Mac, with event details, reviewed replies, and room to plan.
Horizon, Calendar, Day, and Scheduling give you different perspectives.
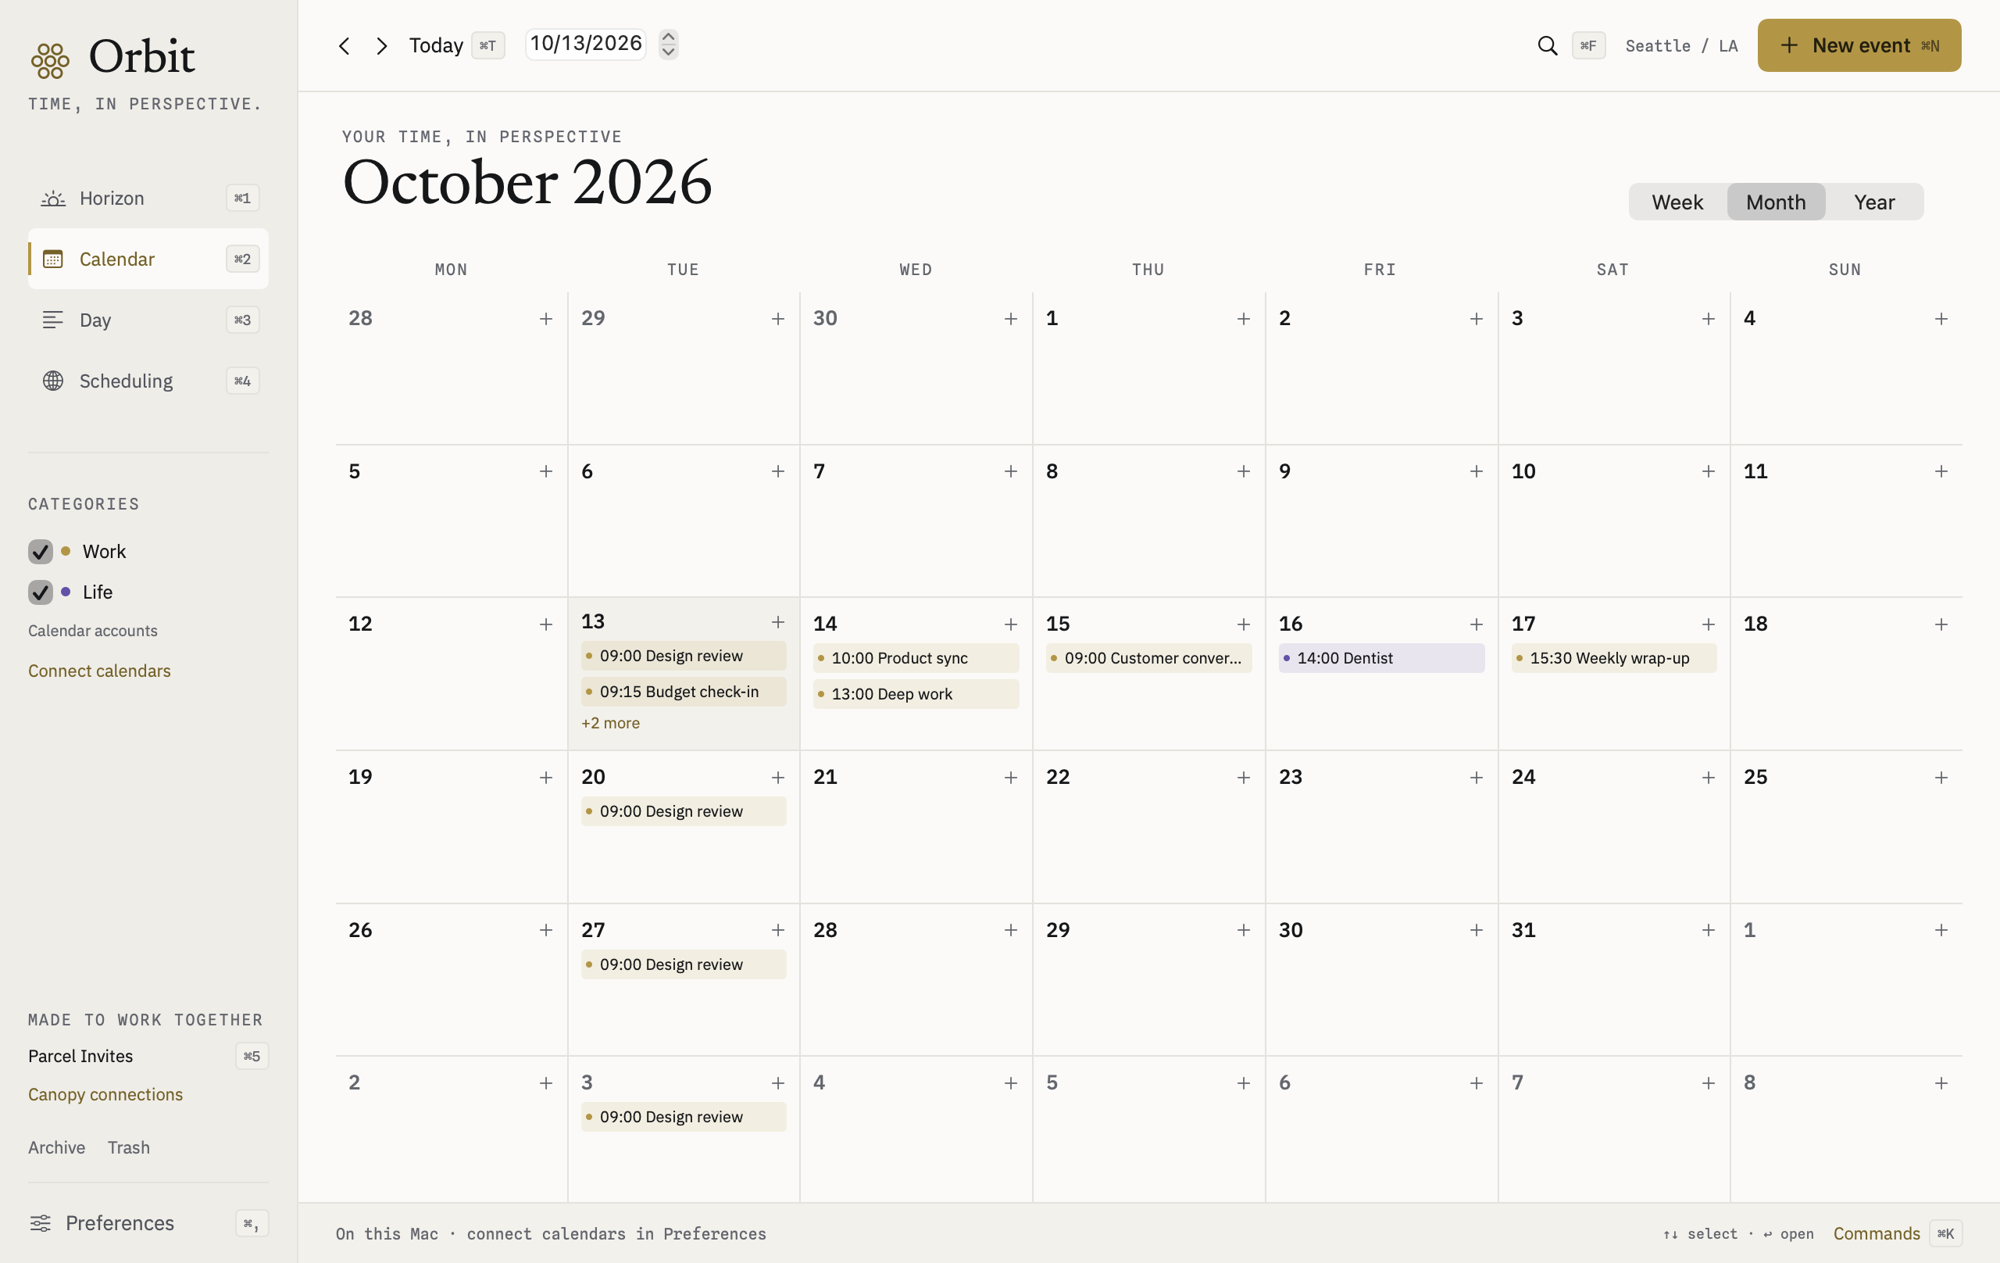
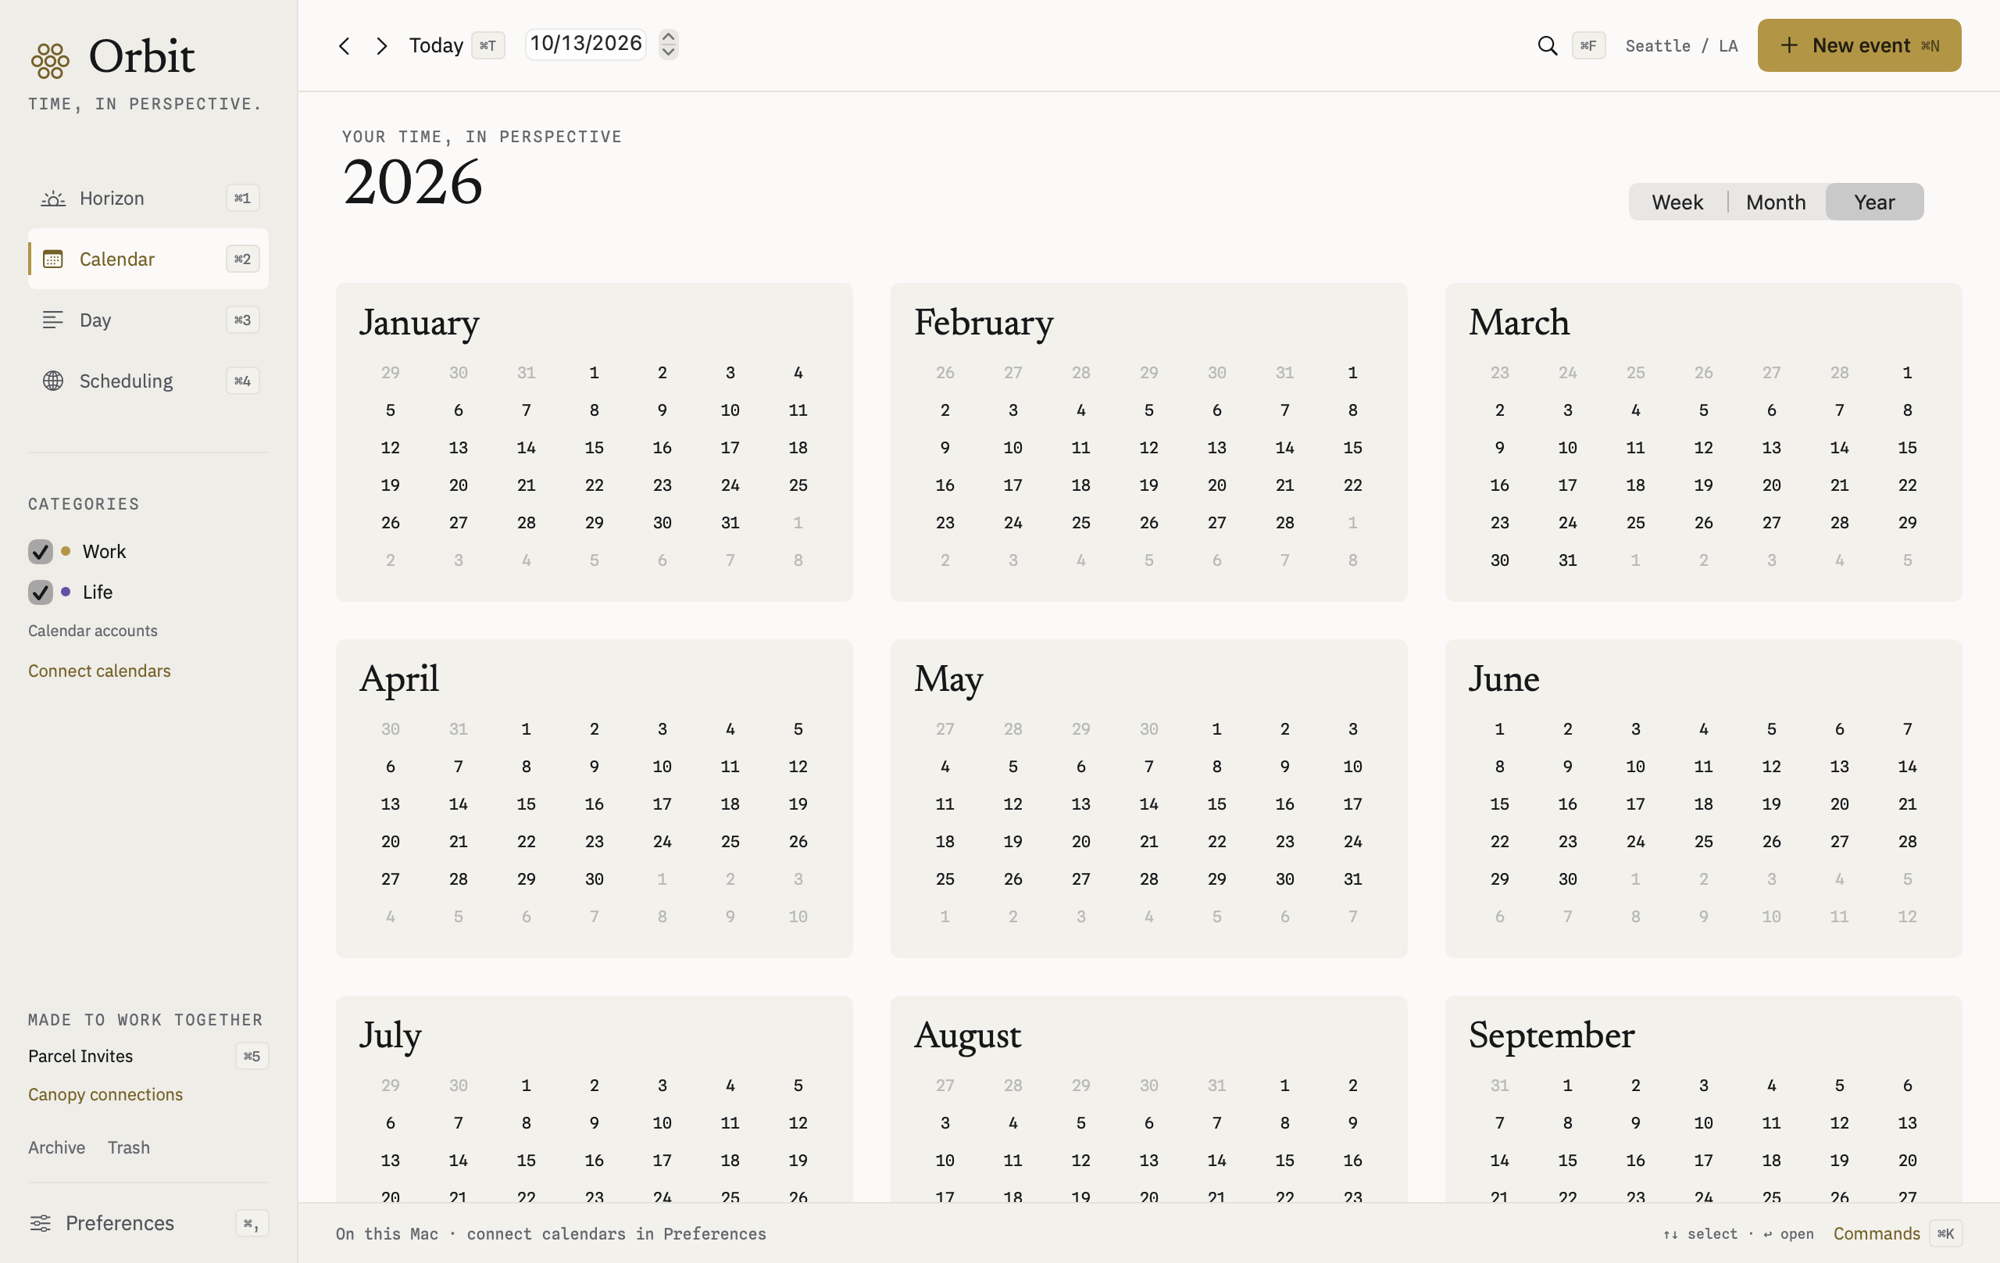
Use ⌘1–⌘4 to switch the four main views. In Calendar’s Almanac layout, choose Week, Month, or Year.
In Week, drag empty cells for a quarter-hour event range. Drag an event to move it, or its lower grip to resize it.
In Month, drag across empty dates for an all-day range, or move an event to another date. A recurring move opens the editor for scope review.
Use ⌘Z for supported local changes and account edits. Open Scheduling to compare configured working hours across time zones.
Participant shading is configured working time, not another person’s live free/busy.
Current native month view with demo calendars. Click to enlarge ↗Current native year overview with demo events. Click to enlarge ↗Back to Orbit ↑
Create and edit a repeating event
Repeat rules preserve the event’s local wall time across daylight-saving changes.
Create an event with ⌘N or open a saved event’s Dossier → Edit. Set the start, exact end or duration, and event time zone.
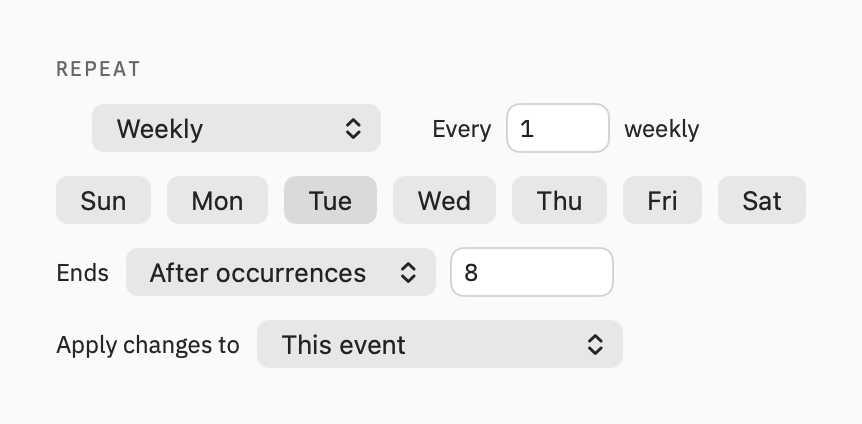
Choose a daily, weekly, monthly, or yearly repeat. Set the interval; choose weekdays or an nth/last-weekday pattern when the selected rule offers them.
Choose whether the repeat ends after a number of occurrences or on a date, then review the rule before saving.
When editing or deleting a repeat, review the scope: one occurrence, this and future events, or the series. Do not assume an edit changes only the displayed date.
Provider series deletion requires confirmation and cannot be undone in Orbit. Import reports unsupported repeat patterns instead of silently simplifying them.
Native recurrence detail fixture showing selected weekdays, an eight-occurrence ending, and edit scope. Click to enlarge ↗Back to Orbit ↑
Find an event and use its Dossier
Search beyond the currently visible navigation window.
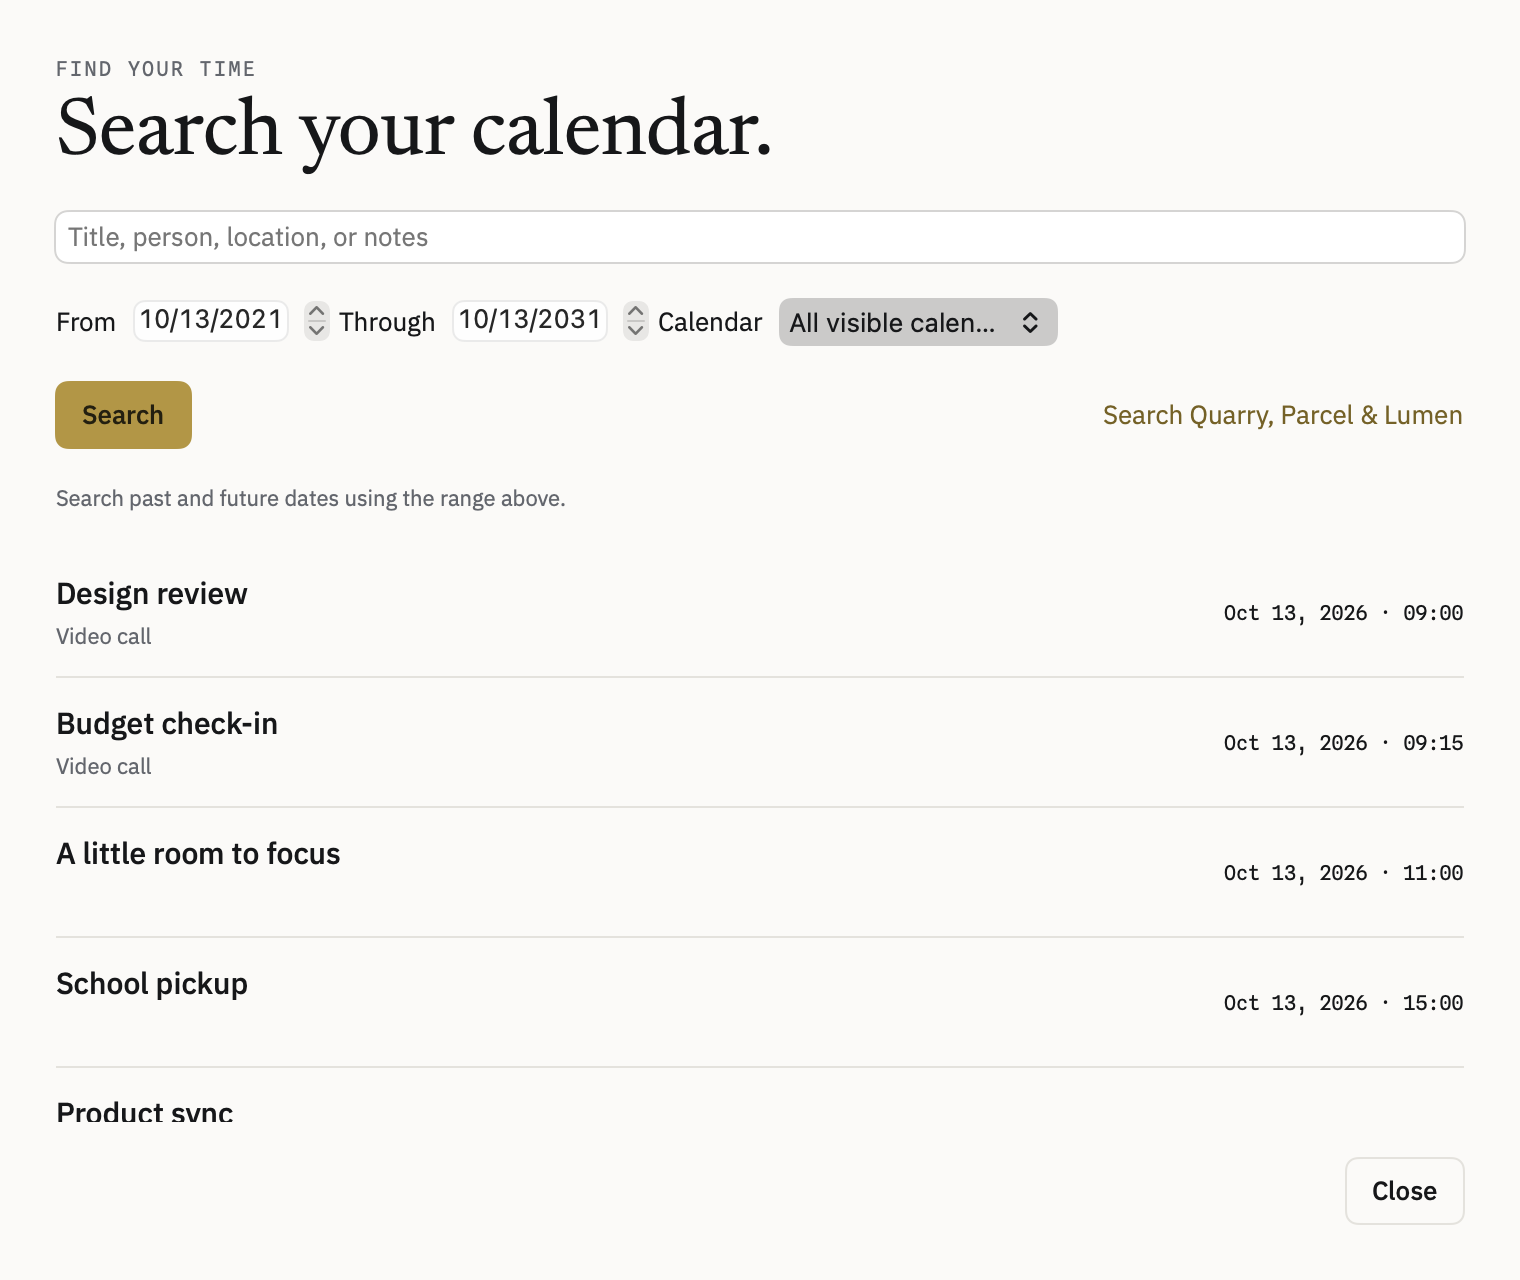
Press ⌘F. Enter words and set the date range and calendar filters. Matches can come from titles, people, locations, and notes.
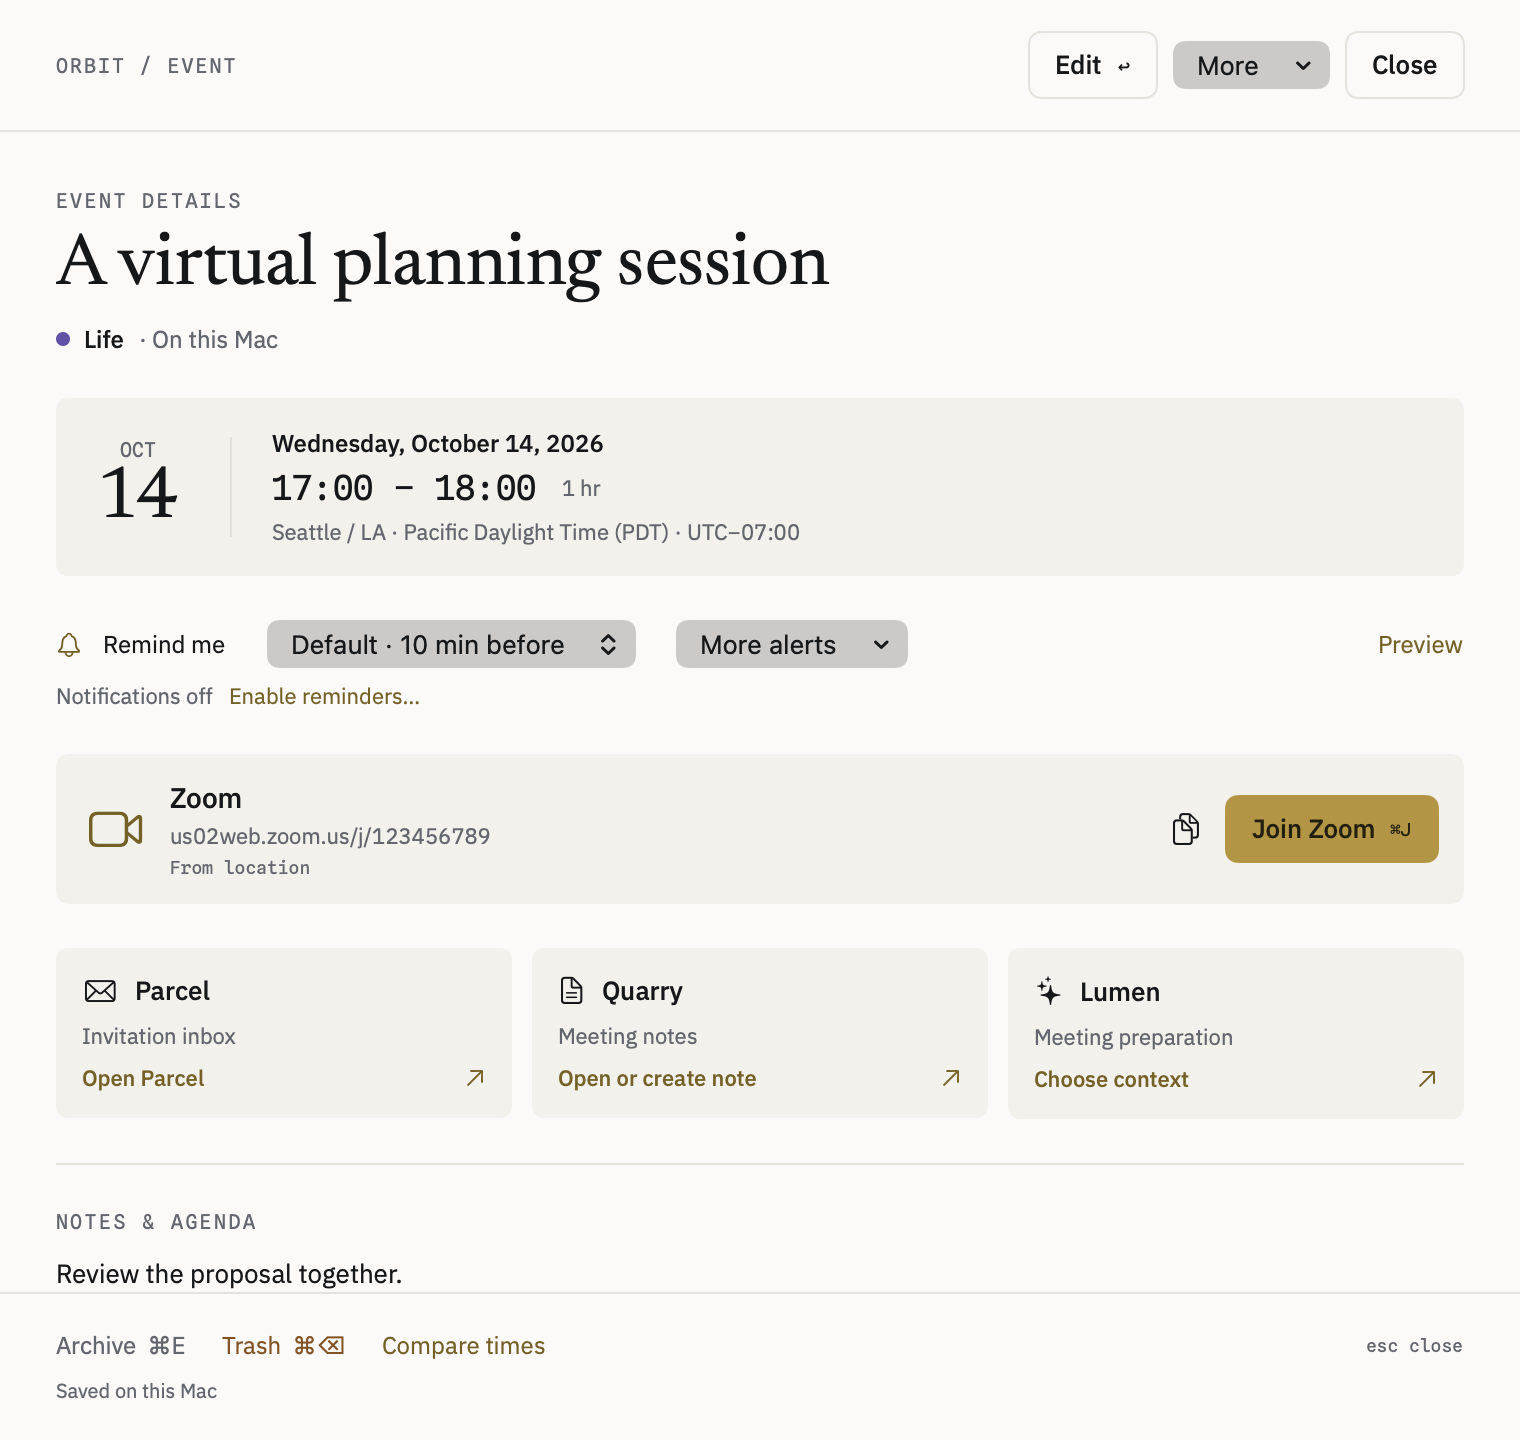
Open a saved event to see Dossier. Use Edit or Return for its separate edit form. Cancel or Escape discards unsaved edits.
Use the Dossier menu to Duplicate or Copy. Outside text fields, ⌘D, ⌘C, and ⌘V provide the related event actions.
Use a call’s Join card, or ⌘J for the first call link. For a physical location, inspect Maps or choose Open in Maps. Linked Parcel, Quarry, and Lumen actions use approved connections.
Native calendar search with demo content and calendar/date filters. Click to enlarge ↗Native Dossier with a sample virtual meeting and its Join action. Click to enlarge ↗Back to Orbit ↑
Reply to an invitation through Parcel
A saved calendar copy and a delivered reply are separate outcomes.
Open an invitation using Parcel’s Open in Orbit, or use Orbit’s Parcel Invites with ⌘5. Approve the updated calendar-reply capabilities if requested.
For an invitation linked to a verified Parcel source, choose the offered Accept, Maybe, Decline, or proposed-time action.
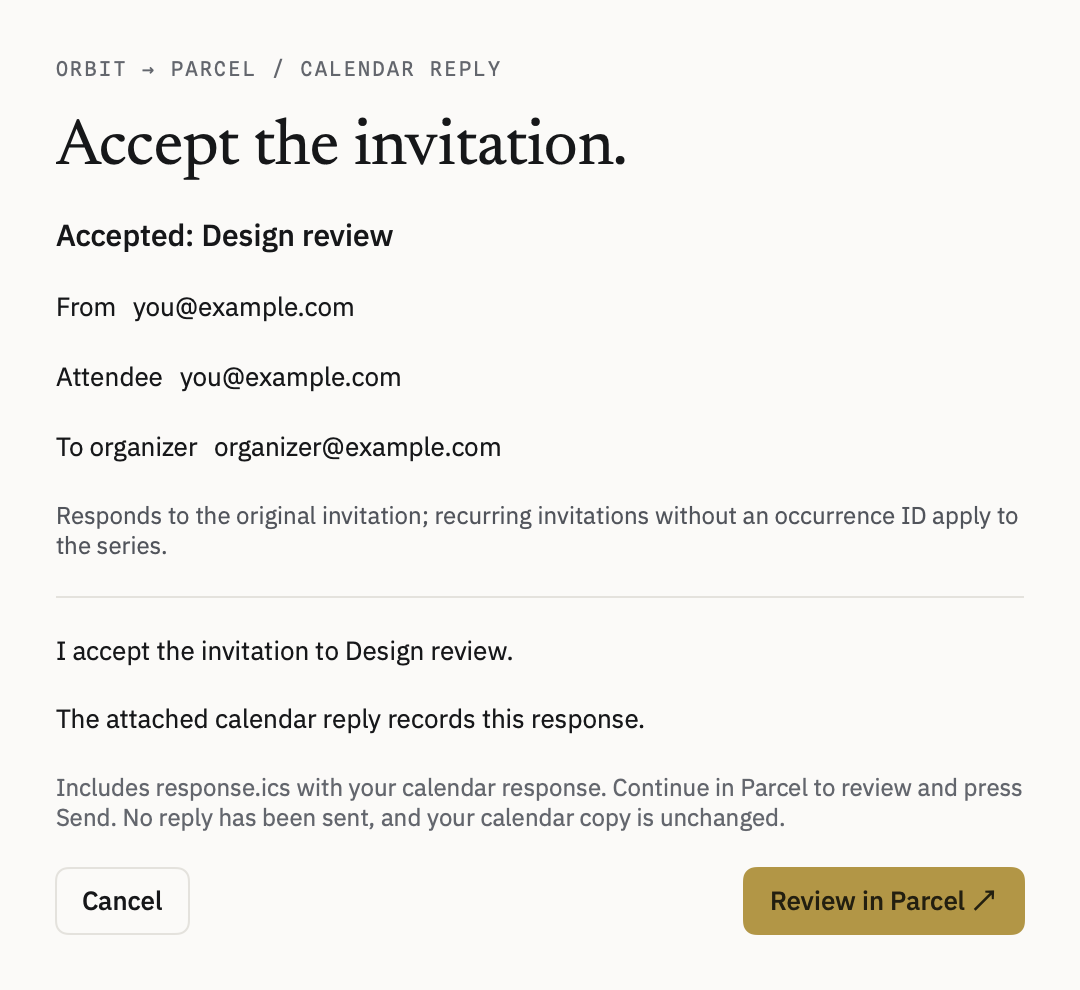
Review the original sending account, attendee, organizer, and response. Choose Review in Parcel.
Inspect the resulting editable reply and calendar attachment in Parcel. Press Send only when you are ready.
Save a calendar copy separately if needed. Track whether the reply is draft, queued, sending, sent, failed, or uncertain.
The screenshot shows an Accept review before any reply is sent. A draft is not a delivered RSVP. Saving a standalone .ics file with no verified Parcel source remains a save-only operation.
Provider acceptance of a sent message is not evidence that a recipient accepted an invitation.
Native fixture: Accept review with original sender, attendee, organizer, and Review in Parcel. Click to enlarge ↗Back to Orbit ↑
Invite guests, update, or cancel
Guest communication is reviewed and sent through Parcel.
Enter guests by email in the event editor; optionally use macOS Contacts suggestions.
Open the saved event’s Dossier and review guest response status.
Choose the offered invitation, update, or cancellation action. Inspect the destination and message, then continue to Parcel for final sending.
When editing a connected account event, remember that the calendar provider may notify its existing guests independently of a Parcel draft.
Updated Parcel and the appropriate approved invitation capabilities are required. A local event save by itself sends no invitation.
Use Orbit’s reminders with the timing and sound you choose.
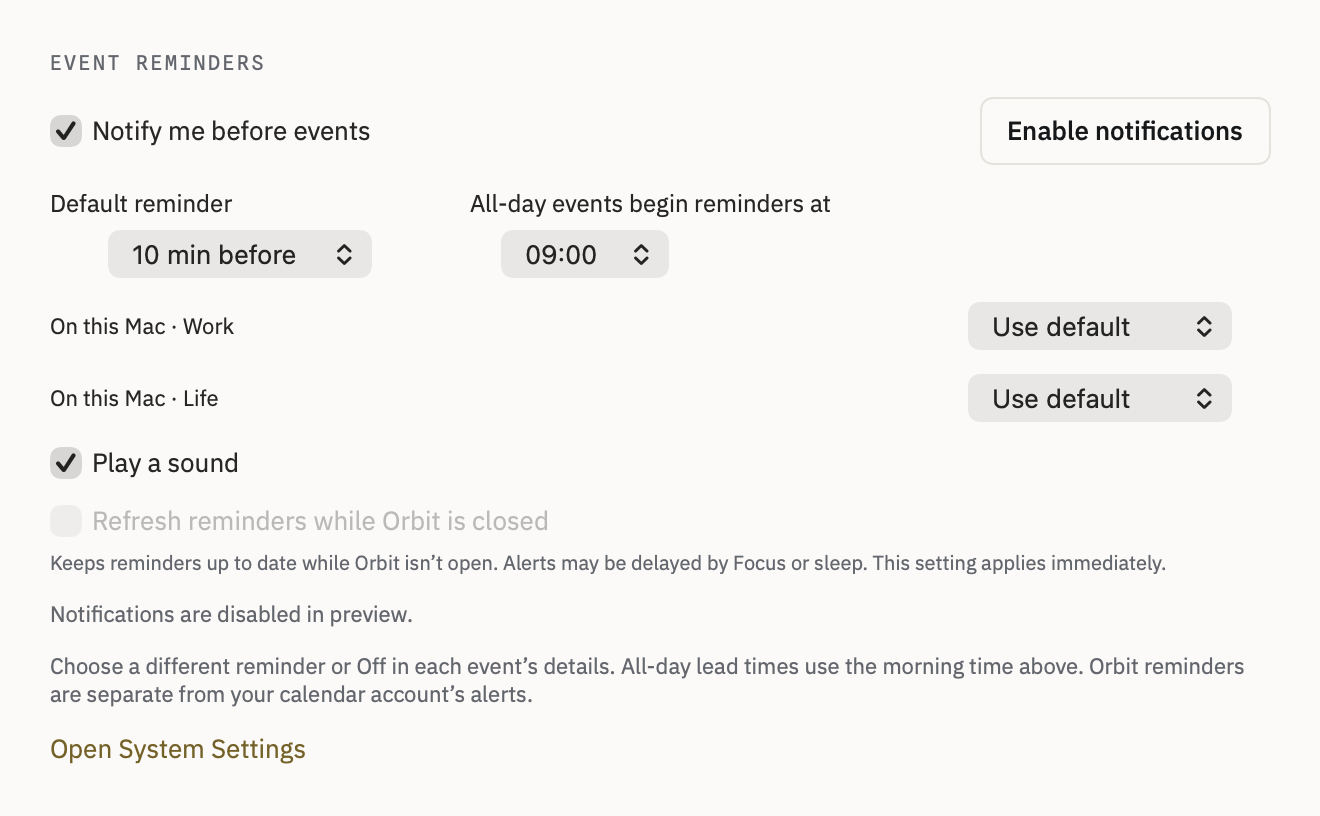
Open Preferences → Event reminders → Enable notifications, complete macOS notification permission, and save preferences.
Set a default lead time and all-day reminder hour. Adjust calendar defaults, up to four additional alerts, or the individual event’s timing as needed.
Use Preview in Dossier to inspect Beacon without sending a notification. Beacon keeps the event, countdown, call or Maps actions, and available linked context in view.
Use snooze in Beacon or notification actions. Enable the optional background reminder agent if you want refresh while Orbit is closed, and complete the macOS Login Items approval.
Focus, sleep, and notification permission affect delivery. The closed-app helper uses cached subscription feeds; it is not a promise that every provider calendar will refresh while Orbit is closed.
Orbit’s settings preserve provider alarms, so provider reminders may also arrive. Lumen’s quiet routines have different behavior and do not run while Lumen is closed.
Native reminder preferences capture. This illustrates settings, not proof of notification delivery. Click to enlarge ↗Back to Orbit ↑
Subscribe, import, and recover local calendars
Bring calendar data in through reviewed controls.
Connect Google or iCloud through Preferences → Connect calendars and the corresponding macOS account. Choose calendars and refresh with ⌘R.
Under Subscriptions & backup, enter a calendar name and HTTPS/webcal URL and choose Subscribe. Optionally add Apple’s US holiday feed or enable Contacts birthdays.
Choose Import calendar (.ics)…. Inspect readable events, unsupported items, duplicates, and the destination category before Import.
Use Export calendar… to share calendar data. Supported repeat rules, exclusions, exceptions, and time-zone transitions travel with the export.
Use Restore backup… to recover local events. Daily local snapshots retain the latest thirty; restoration makes a safety copy and can be undone.
Subscriptions are read-only. Provider export covers the loaded window. Restoring a local backup does not roll back Google or iCloud calendars.
Calendar status describes the last successful Mac calendar read or save, not a provider server’s acknowledgment of synchronization. Real provider recurrence writes, final invitation delivery, and background delivery still require manual acceptance checks.
Pins and saved searches are remembered separately for each notes folder.
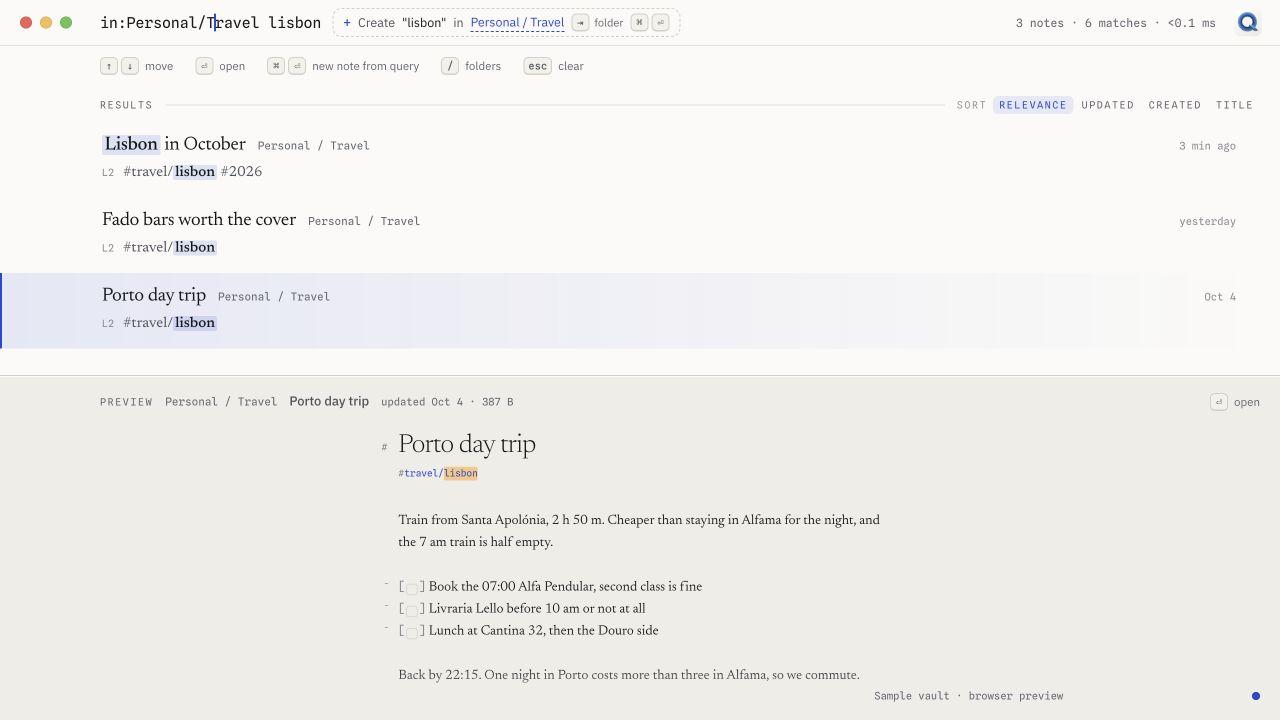
Choose your Markdown notes folder in the installed app. Use Search or create a note to find words, or filters such as in:Personal/Travel, #travel, has:file, and an exact phrase.
Right-click a note or folder and choose its pin action. In a note, the writing bar’s star pins or unpins it.
Run a query and choose Save search. Give it a name. The named search and pinned items appear above results.
Use Back/Forward or ⌘[ / ⌘] after following a note link. Quarry can reopen the last note or search and restore the note’s scroll position after launch.
Earlier app capture: local search with matching lines and preview. Click to enlarge ↗Back to Quarry ↑
Use writing tools and Find and Replace
Keep formatting and text size close to the note.
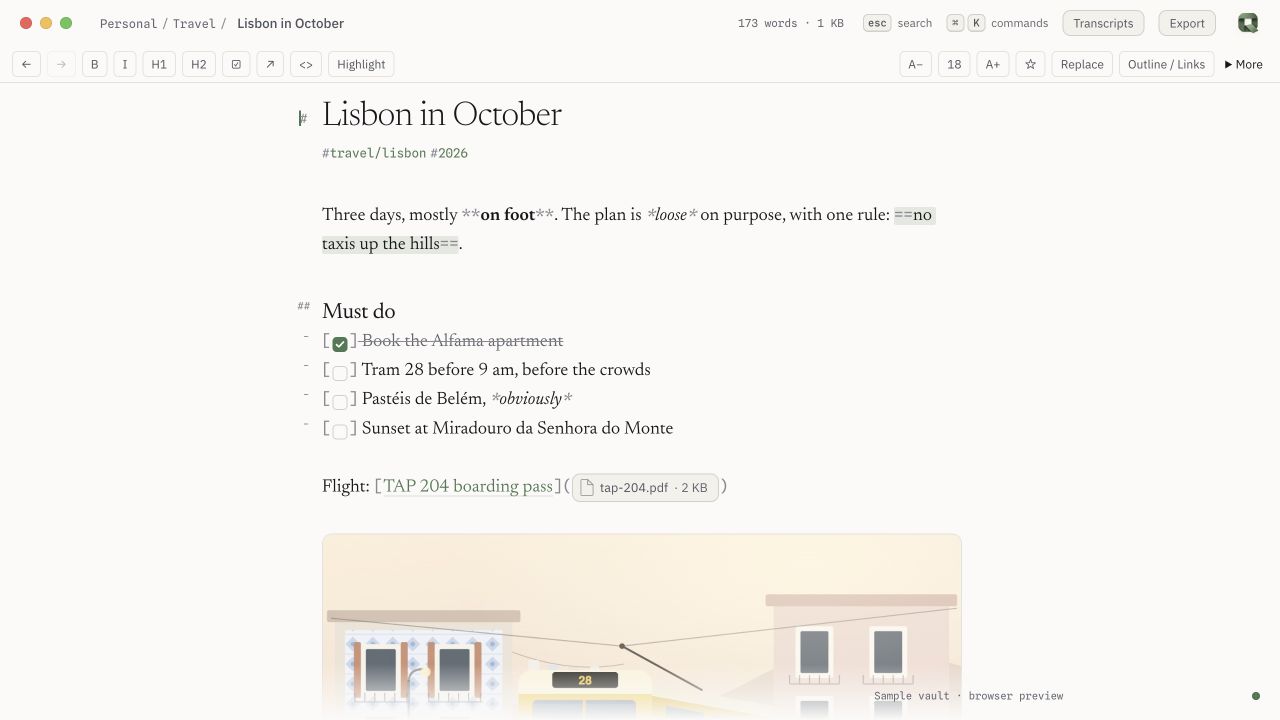
Open a note. Use the writing bar for bold, italic, headings, checkboxes, links, inline code, and highlight.
Choose the smaller/larger text buttons or ⌘− / ⌘+. Use ⌘0 to reset the text size.
Choose Replace or press ⇧⌘F. Enter the text to find and its replacement, then choose Replace next or Replace all.
Undo a replacement with ⌘Z. Paste a copied screenshot or image with ⌘V; Quarry writes it to the note’s .assets folder and inserts the link.
Replacement is literal and case-sensitive. Attached images use natural-size display, including Retina density handling.
Current Quarry frontend in browser preview: writing bar and a sample Lisbon note. Click to enlarge ↗Back to Quarry ↑
Navigate headings, links, and backlinks
Keep the route between notes visible.
Type [[ in the editor to see note suggestions. Select the intended note and insert the link.
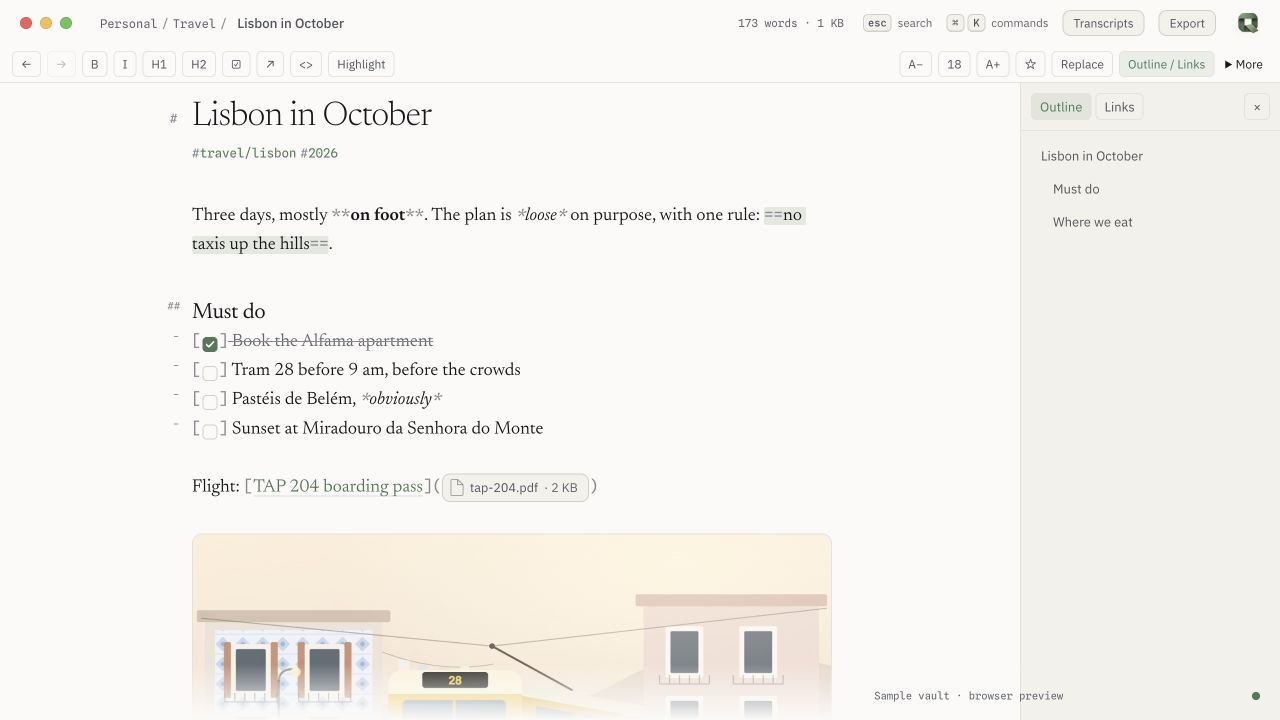
Choose Outline / Links. In Outline, choose a heading to navigate within the note.
Choose Links to inspect outgoing note links and notes linking here. Open an item to follow it.
Use Quarry’s own note or folder move/rename action when reorganizing. It updates internal note links while leaving literal code unchanged.
If another edit arrives during a link update, Quarry preserves it and reports it for review. Moves outside Quarry are not equivalent to its internal link update.
Current browser preview: headings beside a sample note. The Links tab shares this panel. Click to enlarge ↗Back to Quarry ↑
Create a note from a template
Templates are ordinary Markdown notes in the Templates folder.
Open a note you want to reuse and choose More → Save as template, or create a Markdown file in the Templates folder. The original stays unchanged.
Use {{title}}, {{date}}, and {{time}} where the new note should insert its title or local date/time. Templates can include attachments.
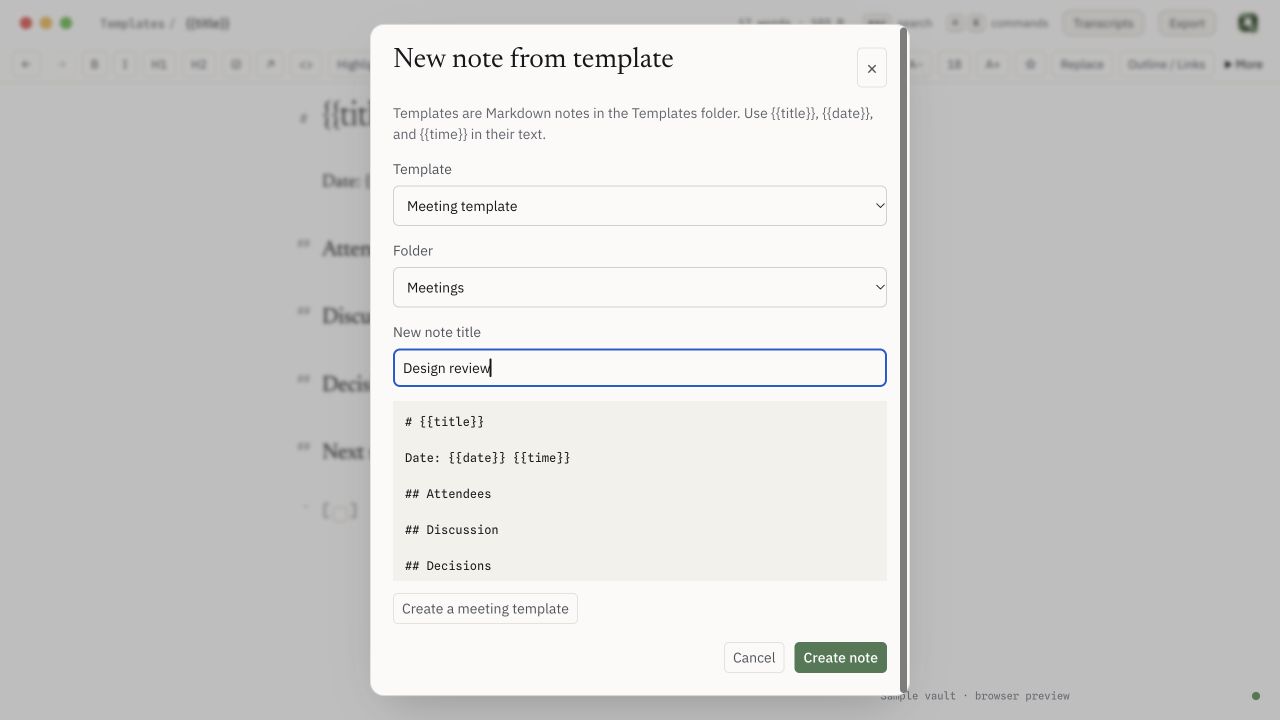
Choose Templates in search or More → New from template in a note. Select the template, destination folder, and new title.
Inspect the template preview and choose Create note. If you have no templates yet, use Create a meeting template as a starting point.
Current browser preview: synthetic meeting template, Meetings destination, and Design review title. Click to enlarge ↗Back to Quarry ↑
Duplicate and organize several items
Attachments stay with the note when you use Quarry’s library actions.
Use a note’s right-click menu to duplicate it, including its images, files, and transcripts. Use a folder’s menu to rename it.
Check several rows, or use Command-click and Shift-click to select items together.
Choose the offered move, trash, or export action for the selection. Inspect the destination or shared Trash confirmation.
For a trashed file in a real notes folder, use Finder’s Put Back for recovery.
Delete opens confirmation when an explicit item selection is active. When you are typing a filter, Delete edits that filter until a result is selected.
In the installed app, open the note and choose More → Note history.
Choose a prior version. Compare the current note and selected text side by side.
Choose Restore version, then Confirm restore after reviewing the change. Quarry saves a recovery copy of the current text first.
Keep a full backup of the Markdown folder and its assets for complete library recovery.
Snapshots begin as you open and edit notes in this build. They are sampled at most every 30 seconds and kept for up to 30 days / 500 versions per note. They follow internal renames.
History stores local text outside the notes folder; it does not restore past attachment bytes and does not travel automatically with the vault. Browser preview does not supply installed-app history.
Use the import flow to preview a Bear backup or Obsidian vault before copying notes and assets into the chosen destination.
Open Export to review the note and its attachments. Choose Markdown with assets, self-contained HTML, or the print view for a PDF.
Use Transcripts to attach conversation text beside a note. The transcript remains a sidecar rather than being appended to the note’s Markdown.
Choose optional Git sync for a Git-backed notes folder, or let the folder’s existing sync service move the files. Distinguish a successful local save from completed remote sync.
A full library backup includes Markdown, images, files, and transcript sidecars. Quarry’s note-history snapshots remain separate local recovery data.
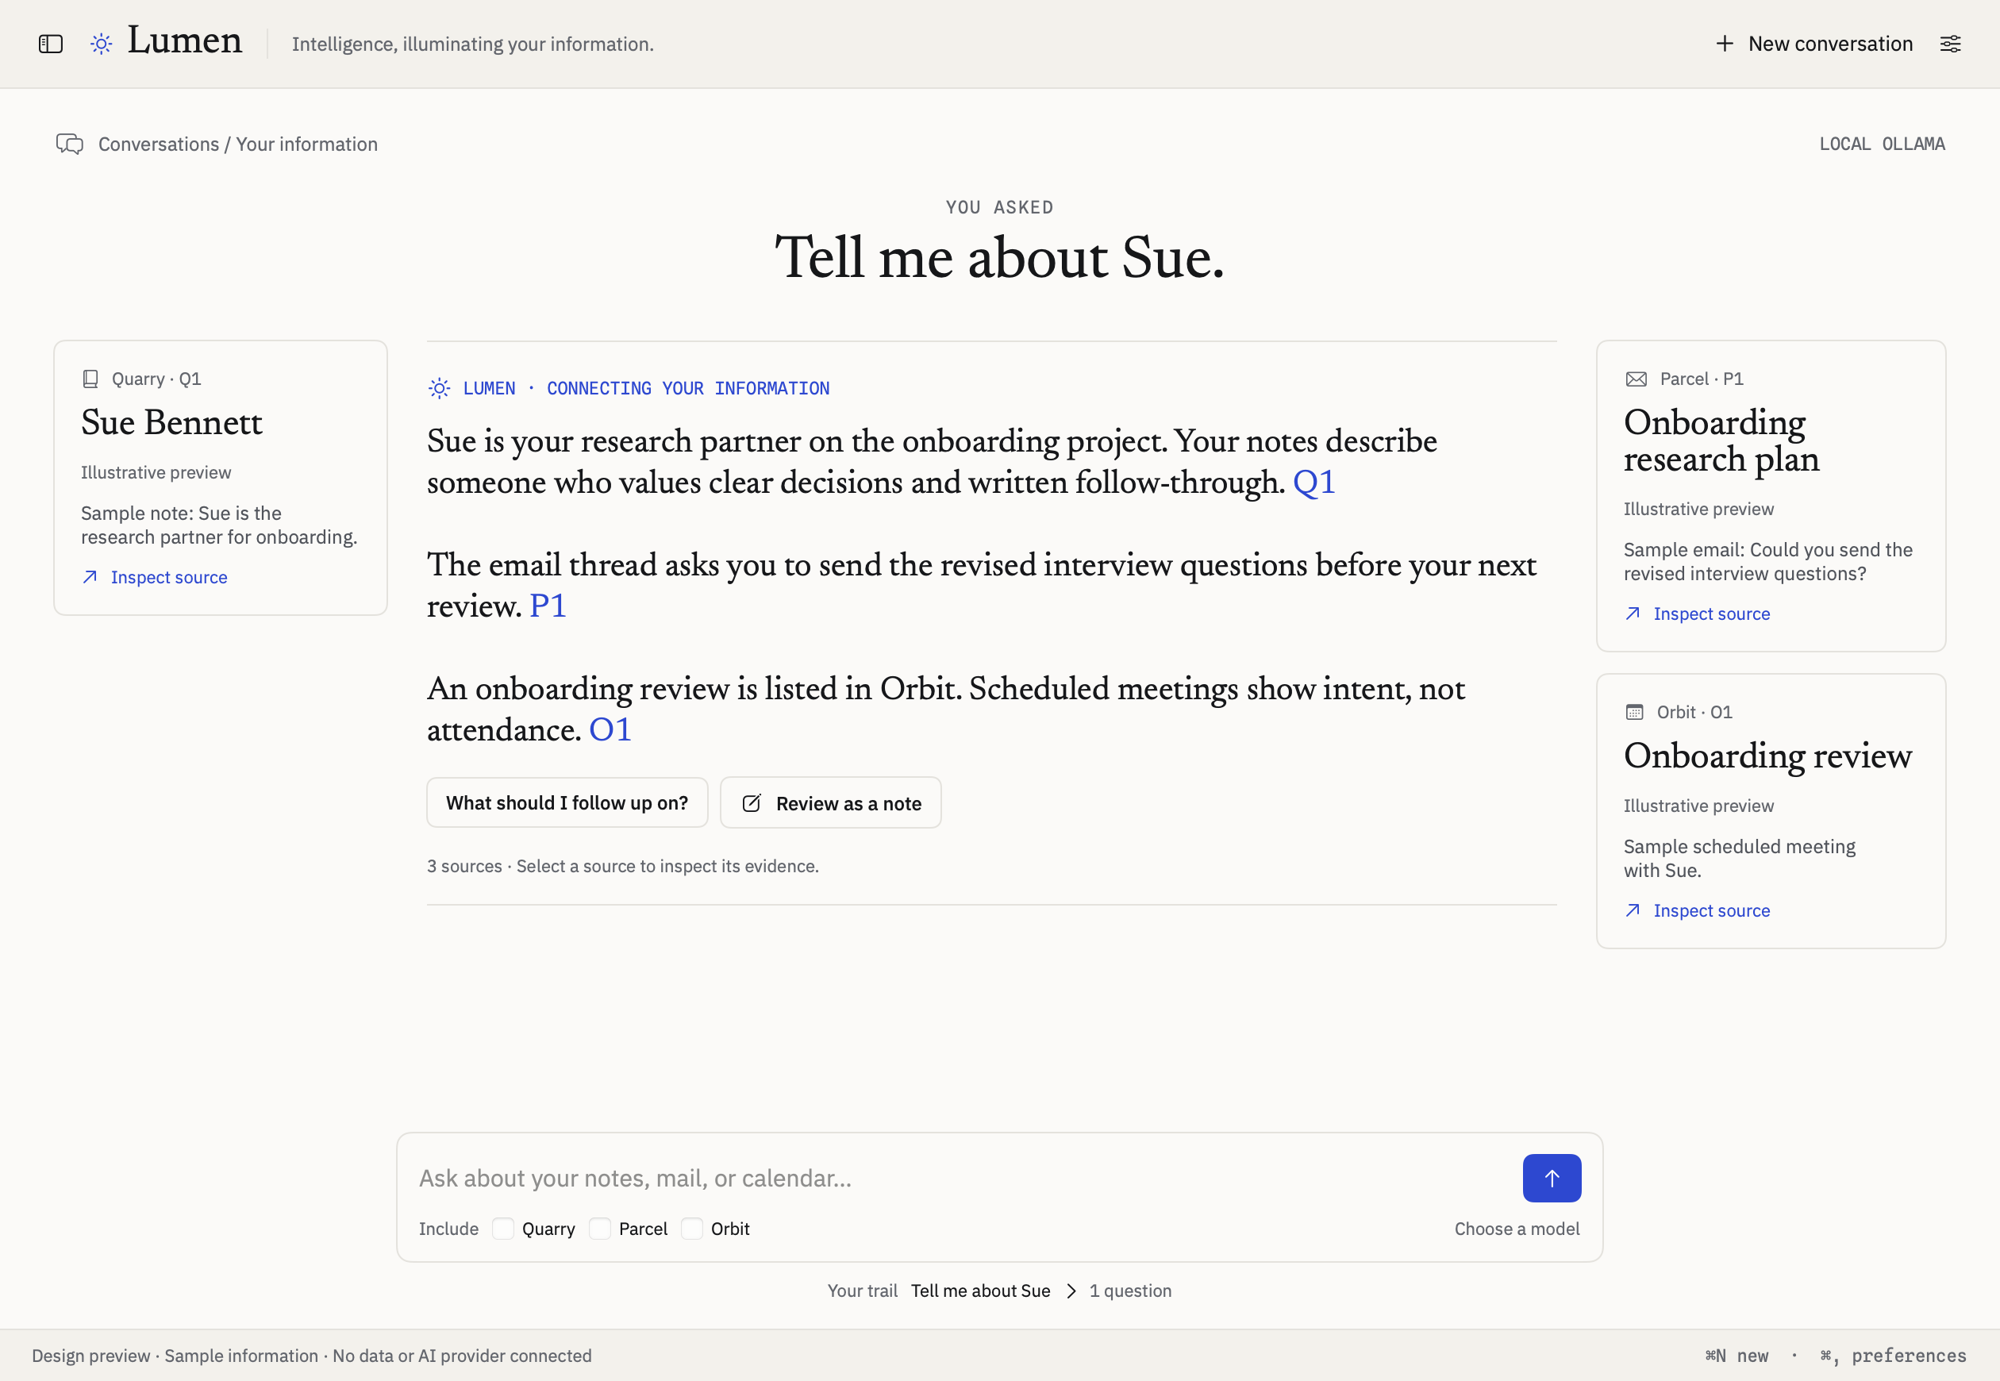
Aperture keeps an answer and its supporting context within reach.
Ask something specific, such as Did Jim send me anything about invoices? or When is my research review?.
If a name is ambiguous, choose the person or provide a fuller name or address. Lumen continues the original request.
Read the answer’s evidence labels and open source cards or citations. Distinguish source-backed facts, confirmed memories, and fallback source context.
Follow up in the same conversation, or choose Review as a note to edit before saving in Quarry.
Personal factual answers validate structured evidence selection and exact source passages. Invalid output can fall back to clearly labeled source context. This validation does not guarantee that every passage answers the question well.
Missing, disconnected, or incomplete source coverage remains meaningful. A mail count can stay per account rather than pretending it is a verified combined total.
Aperture app capture with a synthetic person and source cards. Click to enlarge ↗Back to Lumen ↑
Prepare Today, a meeting, or next week
Start with facts and selected priorities, then request synthesis when useful.
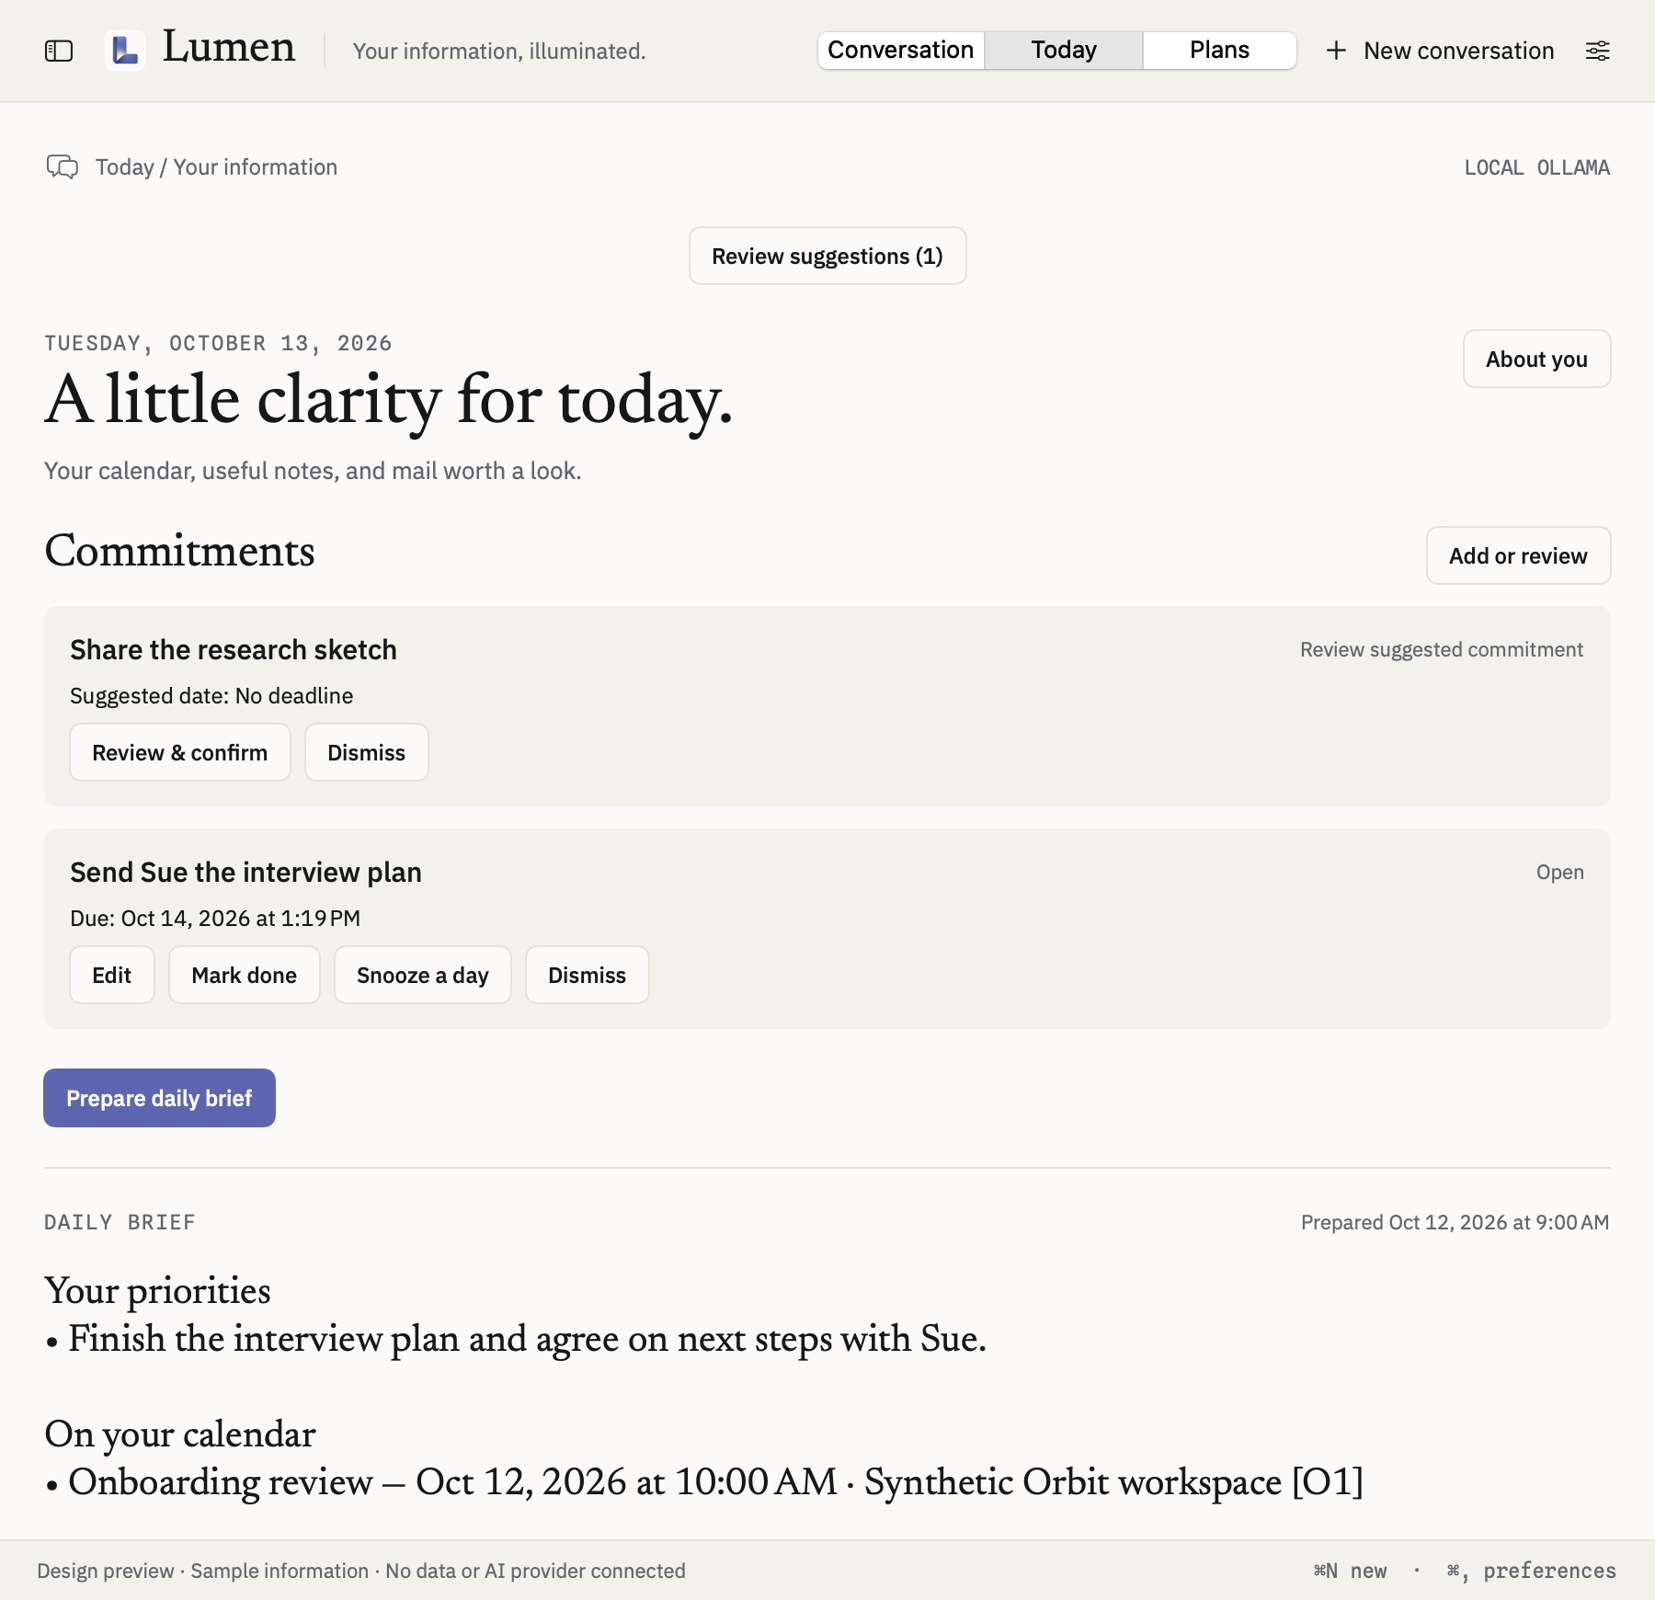
Open Today and choose Prepare daily brief. Review open or overdue confirmed commitments and the available source coverage.
Choose a meeting for preparation. A linked occurrence note takes precedence over a title match when available.
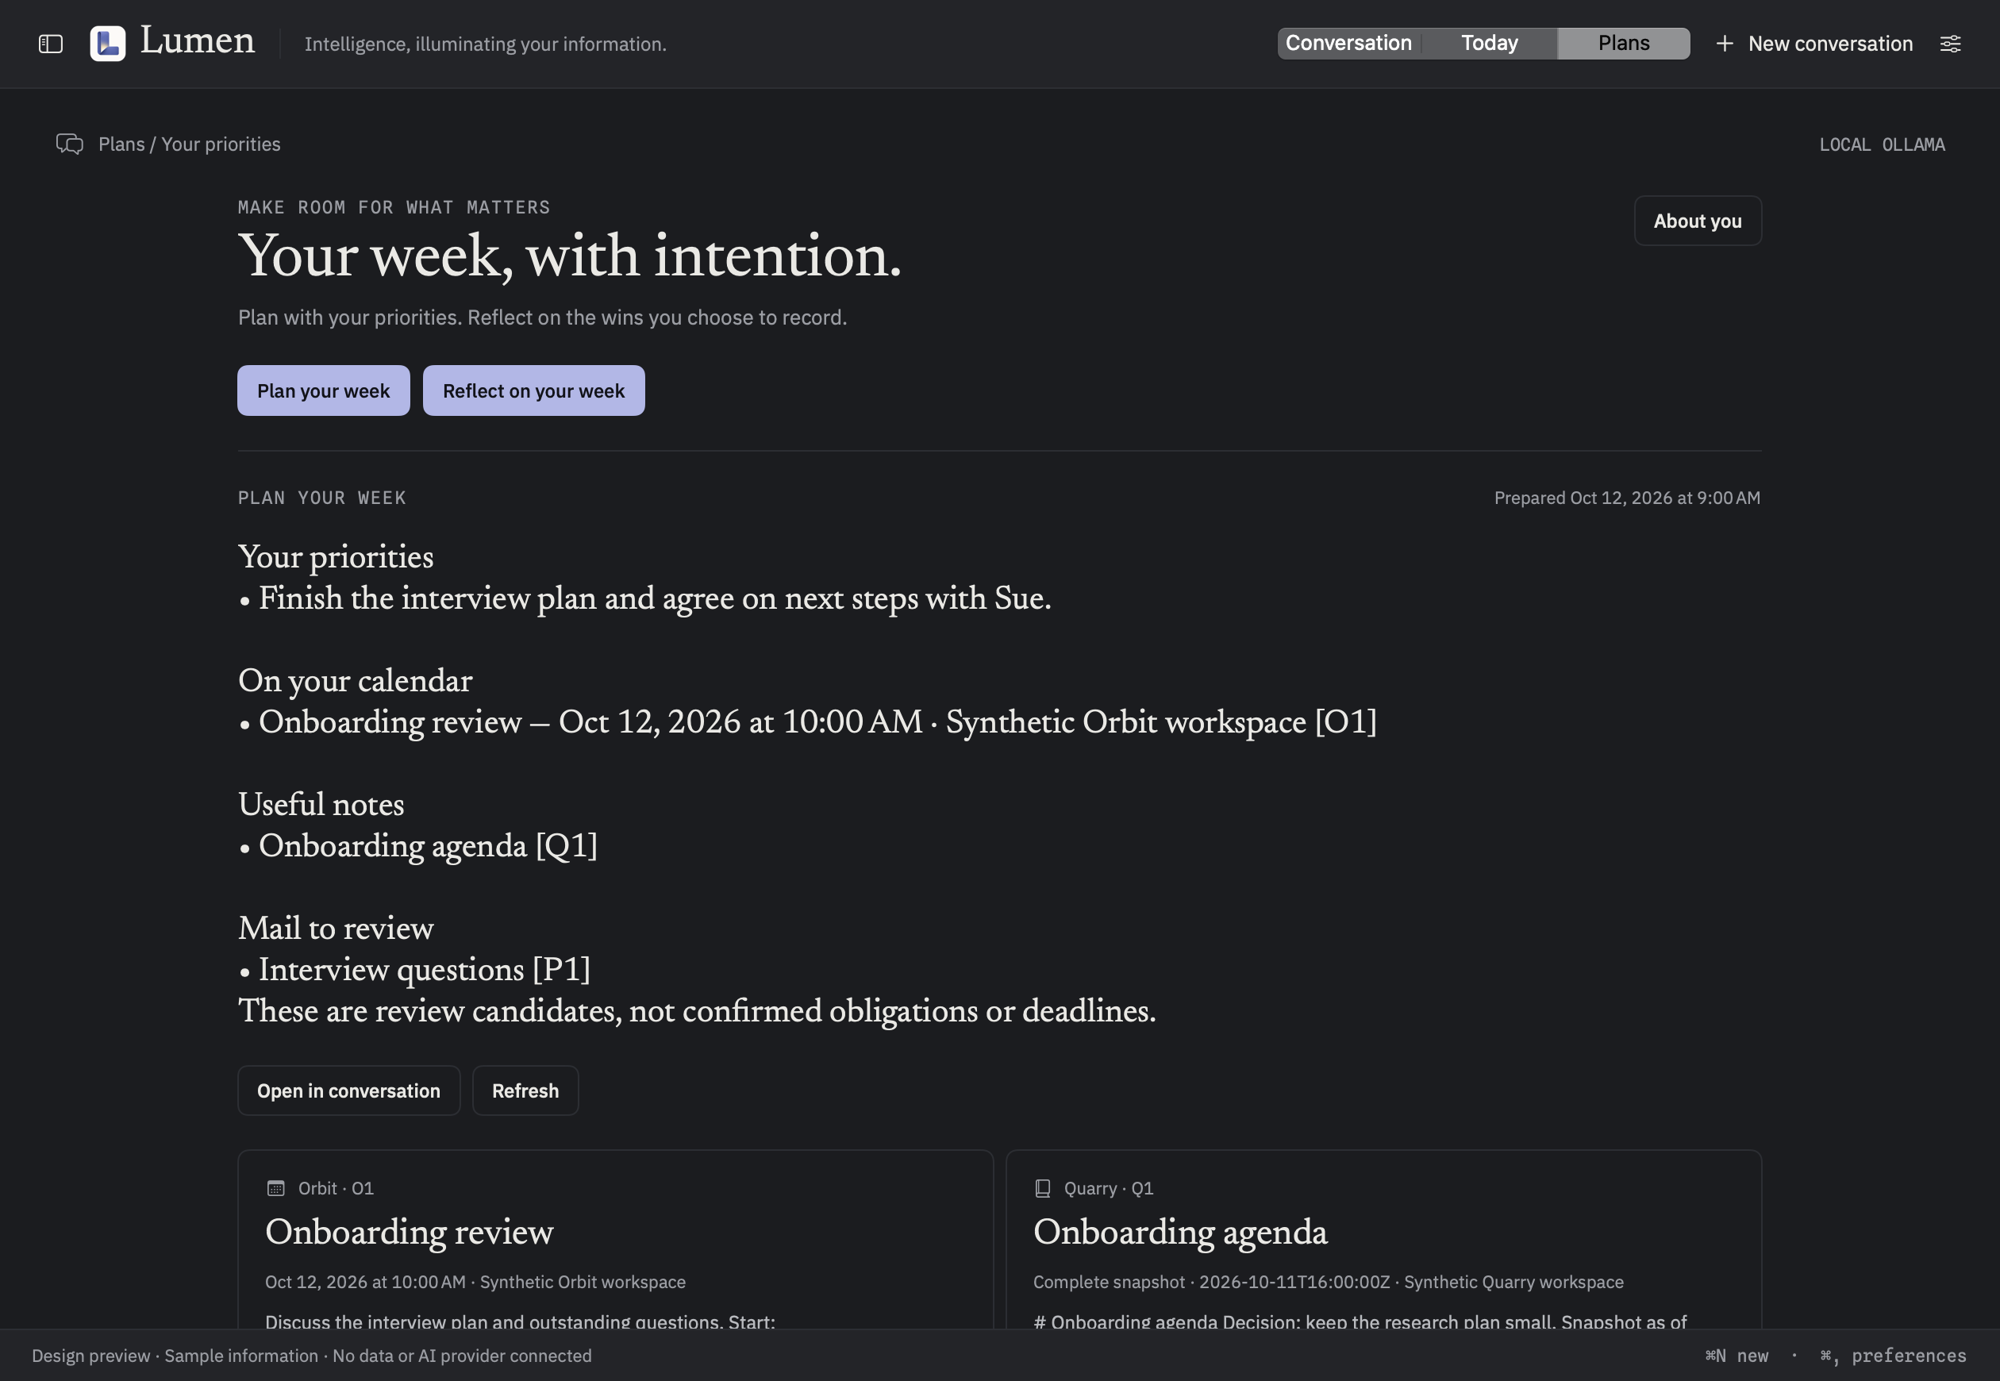
Open Plans for weekly planning or reflection, using your confirmed goals and the next seven local days.
Ask for prioritization if you want model help. Inspect its evidence, then review and save a note or open a reviewed mail/calendar proposal in the owning app.
Calendar entries describe scheduled events, not attendance. Mail follow-up candidates are not confirmed obligations; reflection treats commitments as completed only after you mark them done.
Current native Today fixture with a proposed research commitment and confirmed interview-plan commitment. Click to enlarge ↗Plans app capture in dark appearance with synthetic sources. Click to enlarge ↗Back to Lumen ↑
Choose how Lumen helps
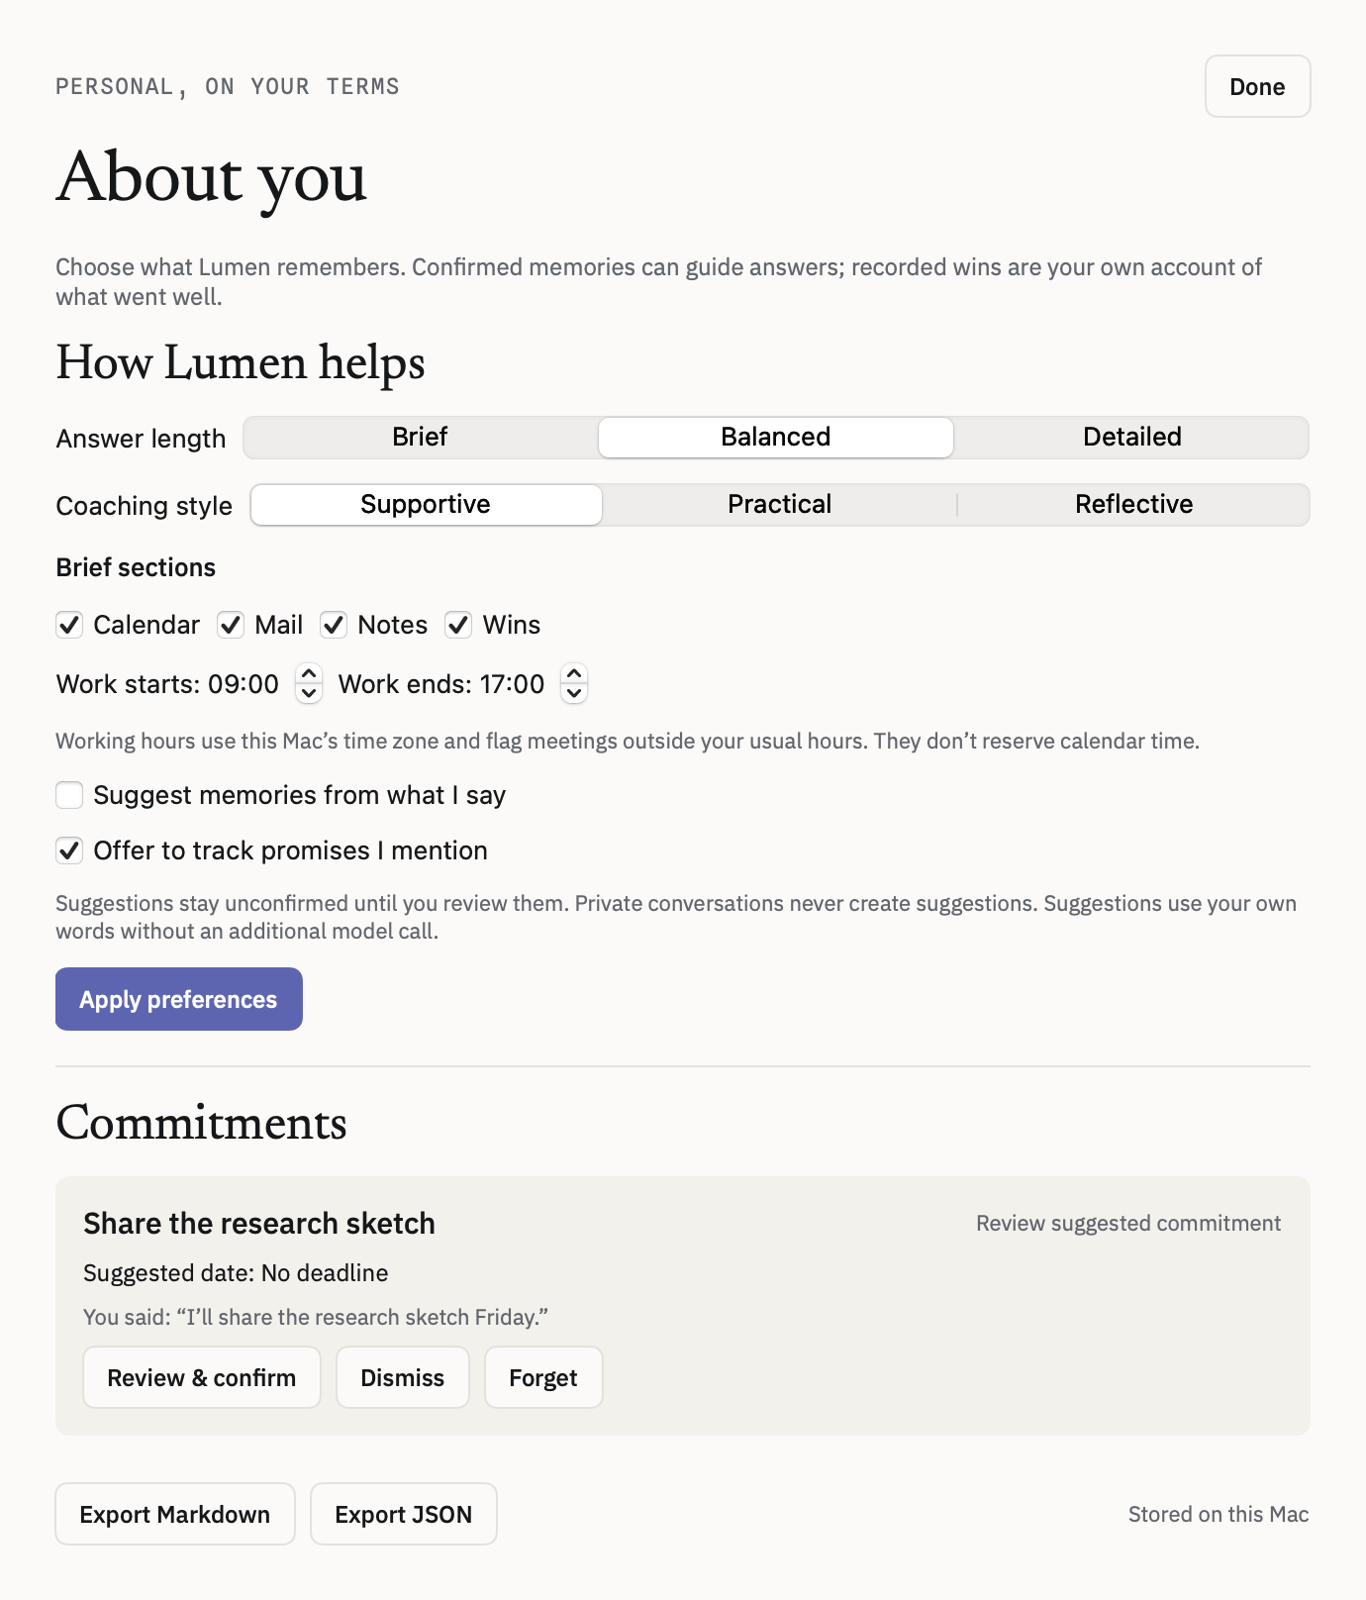
Personalize answers and briefs in About you.
Open About you → How Lumen helps. Select Brief, Balanced, or Detailed answers.
Choose Supportive, Practical, or Reflective coaching.
Choose the Calendar, Mail, Notes, and Wins sections you want in briefs. Set your usual working hours.
Choose Apply preferences. Hidden app sections are excluded before brief retrieval; connection permissions remain separate.
Working hours use this Mac’s time zone to flag meetings outside your usual hours. They do not reserve time on your calendar.
Current native About you fixture with behavioral controls and a proposed commitment. Click to enlarge ↗Back to Lumen ↑
Review and track a commitment
A tracked promise comes from your confirmation, not a silent email scan.
In How Lumen helps, enable Offer to track promises I mention if you want suggestions from your words.
Say something like I’ll send Sue the proposal Friday, or add a commitment in About you. Choose Review & confirm for a suggestion.
Edit the wording and review the suggested deadline. Choose Confirm commitment or save a manually entered commitment.
Use Mark done, Snooze a day, Edit, or Dismiss as appropriate. In About you, use Reopen or Forget when needed.
Snoozing changes visibility, not the deadline. Today uses confirmed commitments, and weekly reflection celebrates only those you marked done. Tracking does not send mail or create calendar events.
Keep the facts Lumen remembers inspectable and correctable.
In About you, review names, preferences, goals, personal facts, and wins. Edit, forget, expire, or export records as Markdown or JSON.
To teach a relationship, provide a specific identity, such as Remember that when I say my dad I mean Alex Example [email protected].
If desired, enable Suggest memories from what I say in How Lumen helps. Narrow statements from your own words can propose a memory.
Confirm, edit, or dismiss the proposal. A conflicting statement proposes a correction instead of replacing your confirmed record.
Memory suggestions default off. Unconfirmed proposals, expired or disconnected source memories, and private conversations stay out of personal AI context. These lightweight rules do not automatically extract facts or obligations from mail bodies.
Choose whether a conversation is remembered and when you see a gentle prompt.
Choose File → New Private Conversation for a chat that avoids saving the conversation and learning or using personal memory.
Configure optional routines in About you. Choose the local hour and weekdays for an in-app prompt.
Prepare or dismiss the prompt to acknowledge that day. Reopening Lumen can catch up once.
Delete saved conversations through their history menu when needed. Forgetting a memory does not delete a note or conversation you already saved.
Routines default off. They do not run models, send system notifications, or execute while Lumen is closed. Connections and selected-source AI permission still apply in private mode.
Link a note or proposed event to its source thread.
In Parcel, select the thread and choose the Quarry note or Orbit scheduling action.
Review the proposed note’s destination, or the event’s calendar and dates. Save in the destination app.
Use the retained source link to return to the original conversation. Retry a retained uncertain handoff by checking its status rather than starting a duplicate.
These checks help distinguish missing access, incomplete data, and work still in progress.
What you see
What to do
A source is unavailable
Open its owning app, inspect Connections, and refresh. Reapprove changed identities or capabilities if needed. Do not read “unavailable” as “no matches.”
A draft says sync pending
Keep the local draft. Check the account connection and sync status. Review separately retained copies if another client edited the draft.
Scheduled mail has not sent
Check the selected time, network, and whether the Mac was awake. Parcel or its approved helper must be available. An uncertain result needs Check Sent.
An invitation reply is still a draft
Continue to the existing Parcel draft and review it. Saving an Orbit event does not send that reply.
A reminder did not appear
Check Orbit timing, calendar visibility, macOS notifications, Focus, and helper approval if used. Sleep and Focus can delay or suppress banners.
No note history is listed
Use the installed Quarry app and edit the note in this build. Snapshots are local and begin as you open and edit; browser preview does not provide them.
A note handoff reports conflict
Inspect the open editor and newer text in Quarry. Resolve or close the editor, then check and retry the retained reviewed proposal.
Generation is unavailable
Check Lumen’s endpoint and model. Keep the factual brief and source links, then retry generation when the chosen server is available.
A promise or memory is wrong
Edit or dismiss a suggestion before confirming it. Correct, reopen, or forget an existing record in About you.